Magento performance optimization tips: 13 strategies to improve your store
Optimizing your Magento store’s performance is important to staying ahead of the online market competition. A slow Magento website can lead to frustrated customers, higher bounce rates, and, ultimately, lost sales.
In this article, you’ll learn proven strategies and easy-to-apply tips for improving Magento store performance, from selecting the right hosting provider to using advanced features like Varnish Cache and Elasticsearch.
By the end of this guide, you’ll know how to enhance your eCommerce site’s overall speed, reduce load times, and create a better customer shopping experience, driving higher conversion rates.
Magento performance optimization best practices
Here are simple yet effective strategies to improve your Magento website’s speed and performance.
1. Choose the right Magento hosting provider
Your hosting solution directly impacts your Magento site’s performance, so choose your provider wisely. Ideally, you should host your eCommerce store on dedicated hosting or a virtual private server (VPS) for more resources and better performance.
However, a dedicated server can be expensive, making it less suitable for startups or smaller stores. On the other hand, VPS is a middle-ground solution. With an allocated portion of server resources, it offers better performance than shared hosting and at a more affordable price than dedicated hosting.
Hostinger is known for its high-performance VPS tailored for Magento stores. Our Magento VPS plans offer up to 8 cores of CPU, 32 GB of RAM, and 400 GB of NVMe SSD storage to ensure your store runs smoothly, even during peak times.
Hostinger’s Magento hosting also has comprehensive security features to safeguard your server and customer data, including automated weekly backups, firewall and DDoS protection, and a malware scanner.
Another unique feature is VPS templates, which allow you to set up applications with just a few clicks. This means you can easily install Magento and all its necessary components on your server without configuring everything manually.
What’s more, our VPS service is scalable. You can start with the basic plan and upgrade as your online store grows, ensuring you always have the necessary resources.

2. Run your Magento store in production mode
Running your Magento store in the correct mode can help optimize its performance. Magento offers two main modes: development and production mode.
Development vs production mode
Development mode is designed to build and test your Magento site. It provides detailed error messages and allows for easier debugging. However, activating this mode can slow down your eCommerce store due to constant logging and error reporting.
Meanwhile, production mode is optimized for live sites. It disables unnecessary features that are only needed during development. Running Magento websites in this mode reduces server load, improves stability, and secures your store by hiding error messages that could expose vulnerabilities.
Switch to production mode
To switch your Magento website to production mode, follow these steps:
- Log in to your server via a terminal or an SSH client like PuTTY. For Hostinger VPS customers, find your SSH credentials by navigating to the VPS details section at the bottom of the VPS Overview page.

- Open your Magento installation’s root directory.
- Execute the following command to switch to production mode:
php bin/magento deploy:mode:set production
- Verify your store’s current mode by running:
php bin/magento deploy:mode:show
3. Enable GZIP compression
GZIP compression condenses web files, including HTML, CSS, and JavaScript, before sending them from the server to the browser. This compression can significantly reduce file sizes, sometimes up to 70-90%, leading to faster load times.
It also helps improve your Magento store’s SEO, as faster-loading pages are favored by search engines like Google, leading to better rankings on search engine result pages (SERPs).
Here are the instructions for enabling GZIP compression on two of the most popular web servers, Apache and NGINX:
For Apache servers:
- In your Magento installation’s root directory, open the .htaccess file using the nano text editor:
sudo nano .htaccess
- Insert the following lines of code to enable GZIP compression:
<IfModule mod_deflate.c>
AddOutputFilterByType DEFLATE text/html
AddOutputFilterByType DEFLATE text/css
AddOutputFilterByType DEFLATE application/javascript
AddOutputFilterByType DEFLATE text/javascript
AddOutputFilterByType DEFLATE text/plain
AddOutputFilterByType DEFLATE image/x-icon
AddOutputFilterByType DEFLATE application/x-font-ttf
AddOutputFilterByType DEFLATE application/x-font-opentype
AddOutputFilterByType DEFLATE application/x-font-woff
AddOutputFilterByType DEFLATE application/x-font-woff2
</IfModule>
- Once done, press Ctrl + X → Y → Enter to save your changes and exit nano.
For NGINX servers:
- Open the NGINX configuration file:
sudo nano /etc/nginx/nginx.conf
- Insert these lines within the http block to enable GZIP compression:
gzip on;
gzip_types text/plain text/css application/json application/javascript text/xml application/xml application/xml+rss text/javascript;
gzip_proxied no-cache no-store private expired auth;
gzip_min_length 1000;
gzip_disable "MSIE [1-6]\.";
- Save and close the file.
- Restart the NGINX web server to apply the changes:
sudo service nginx restart
4. Optimize your product images
High-quality images are vital for an eCommerce site because they improve product appeal. However, large file sizes can slow down your website. Below are some Magento image optimization tips for keeping high-quality pictures without negatively affecting the site performance:
Image compression
Compressing images reduces their file size without significantly affecting their quality. Several tools and techniques to compress your website images include:
- Online tools. Use tools like TinyPNG or JPEG-Optimizer to compress images before uploading them to your Magento store.
- Extensions. Install Magento extensions like Image Optimizer, which automatically compresses images during upload. If you’re unfamiliar with installing extensions on this platform, read our Magento tutorial.
- Manual Compression. For more control, use image editing software like Adobe Photoshop to adjust your images’ quality settings manually.
Lazy loading
Lazy loading is a technique where images are loaded only when visitors are about to enter the viewport. This reduces the initial load time of web pages and conserves bandwidth, as not all images are loaded at once.
Please note that lazy loading is not a native Magento feature. To implement it, install the Magento 2 Image Lazy Load Extension and configure it:
- Access your Magento admin panel and go to Stores → MAGEFAN EXTENSIONS → Image Lazy Load.
- In Lazy Load Blocks, select where to apply this technique according to your needs.

- Test your website to make sure that lazy loading is working correctly.
Proper image formats
Next-gen image formats like WebP provide superior compression compared to older formats like JPEG and PNG. They are smaller without compromising quality and details, making them ideal for web use.
However, Magento doesn’t support uploading images directly to WebP by default. Fortunately, the Magento 2 Convert Images to WebP extension can overcome this limitation, as it will automatically convert your images to this format upon upload.
5. Minify and bundle CSS and JavaScript
Minification and bundling reduce CSS and JavaScript file sizes, helping your site load faster and perform better.
Minification removes unnecessary characters, such as whitespace, comments, and unused code, from the source code without affecting its functionality. This allows browsers to download and execute files quickly.
Meanwhile, bundling combines multiple JavaScript or CSS files into one file, reducing the number of HTTP requests a browser needs.
Minify and bundle CSS and JavaScript files in Magento
Magento has built-in features for minifying and bundling these files. Follow the instructions to enable them:
- Go to Stores → Configuration → Advanced → Developer.
- In JavaScript Settings, set Minify JavaScript Files and Enable JavaScript Bundling to Yes.
- Similarly, enable Merge CSS Files and Minify CSS Files in the CSS Settings section.
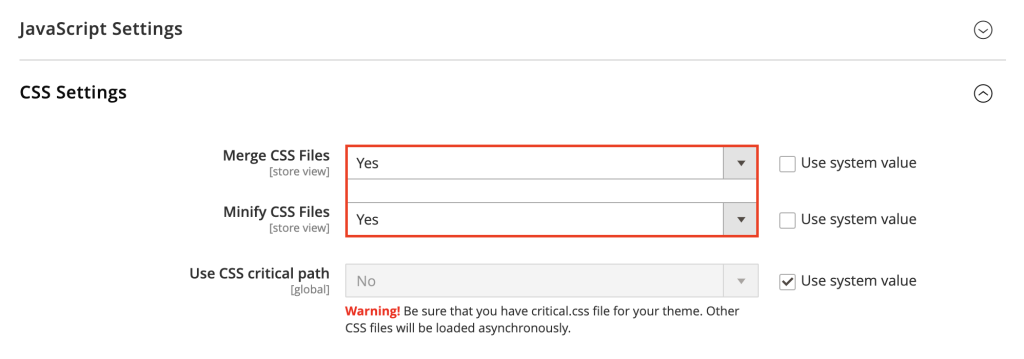
- Click Save Config to implement your edits.
6. Use a CDN
A content delivery network (CDN) is a group of servers distributed across various locations. Its primary function is to deliver static content, such as images, CSS, and JavaScript files, from the server closest to the user, reducing latency and load times.
CDNs handle traffic spikes to ensure consistent performance even during high-demand periods. Several services offer additional security features, such as DDoS protection and secure token authentication, to protect your website.
Integrate a CDN with Magento
To integrate a CDN with your Magento store, choose a provider that meets your needs. Some popular options include Cloudflare, Amazon CloudFront, and Fastly. Then, set up an account and point your domain name to the CDN’s nameservers.
Once done, open your Magento dashboard and follow these steps:
- Navigate to Stores → Configuration → General → Web.
- Expand the Base URLs section.
- Update the Base URL for Static View Files and Base URL for User Media Files fields. Enter the URL provided by your CDN, for example, http://yourcdn.domain.com/.
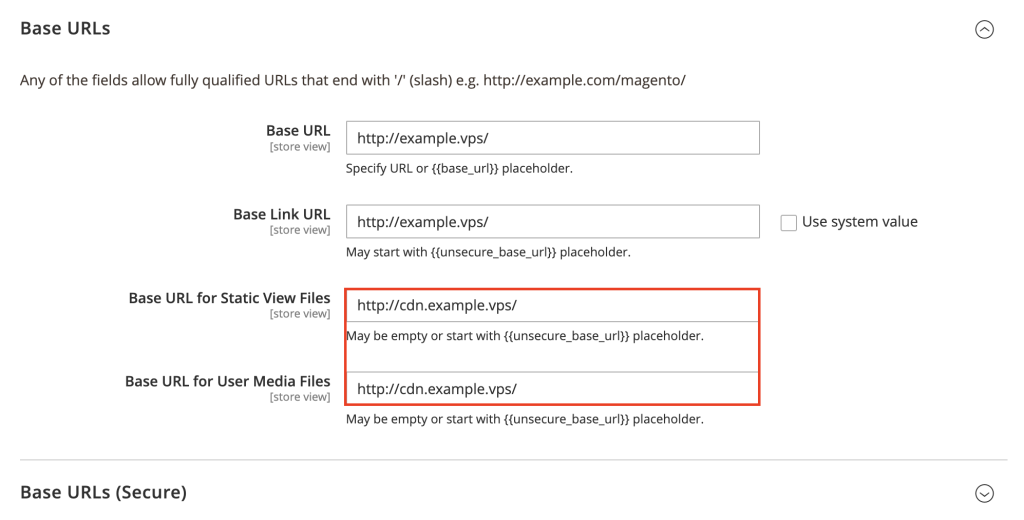
- Open the Base URLs (Secure) section and repeat the same process, but use secure URLs, for instance, https://yourcdn.domain.com/.
- Save your changes.
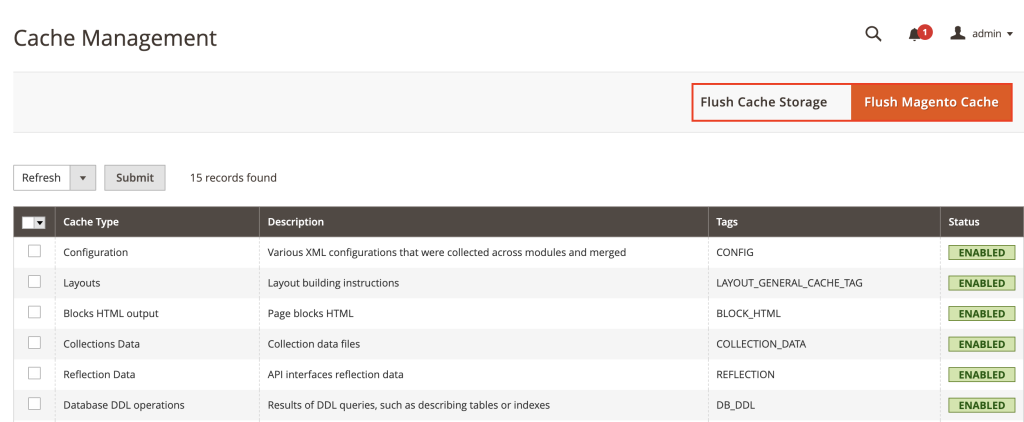
- Go to System → Cache Management and hit both Flush Cache Storage and Flush Magento Cache.
7. Optimize the checkout process
Optimizing the checkout process can improve your eCommerce store’s performance by reducing load times and server stress. It can also boost conversion rates by minimizing cart abandonment.
Reduce the number of steps
A streamlined checkout process reduces customer friction, making it easier and quicker for them to complete their purchase. Fewer steps mean less opportunity for customers to abandon their carts.
Here are some tips to reduce checkout steps in Magento:
- Enable one-page checkout. Go to Stores → Configuration → Sales → Checkout. Change the Enable Onepage Checkout value to Yes in the Checkout Options section.
- Use guest checkout. Allow customers to checkout as guests without creating an account, reducing the time and effort required to complete a purchase. To activate it, set Allow Guest Checkout to Yes.

- Remove unnecessary fields. Simplify forms by removing non-essential fields. Ask for only information that is necessary for processing the order.
- Utilize auto-fill information. Use auto-fill features for returning customers to speed up the process.
Simplify the Process to Minimize Cart Abandonment
A simplified checkout process makes each step as user-friendly as possible. Consider applying these strategies for an improved checkout experience:
- Clear progress indicators. Use progress indicators to show customers where they are in the checkout process and how many steps are left.
- Mobile optimization. Many customers shop on their phones, so ensure the checkout process is fully optimized for mobile devices.
- Simplified forms. When billing and shipping address fields are the same, combine them, reducing the number of fields customers need to fill out.
- Inline validation. Provide real-time feedback on form fields, helping customers correct errors immediately without resubmitting the form.
- Multiple payment options. Provide numerous payment methods, such as credit cards, PayPal, and cash on delivery (COD), to cater to customer preferences.
For inspiration, you can also look at how famous brands like Sigma Beauty modify their Magento websites, including streamlining checkout flows.
8. Utilize caching techniques
Caching works by storing copies of web pages and static content, reducing server load and speeding up response times. Here are some caching techniques you can try:
Full-page caching
Full-page caching stores a full copy of each page on your site so that subsequent requests can be served quickly from the cache. This reduces the time required to generate pages dynamically.
Follow these steps to enable full-page caching in Magento:
- Go to Stores → Configuration → Advanced → System.
- In the Full Page Cache section, set Caching Application to Built-in Cache.
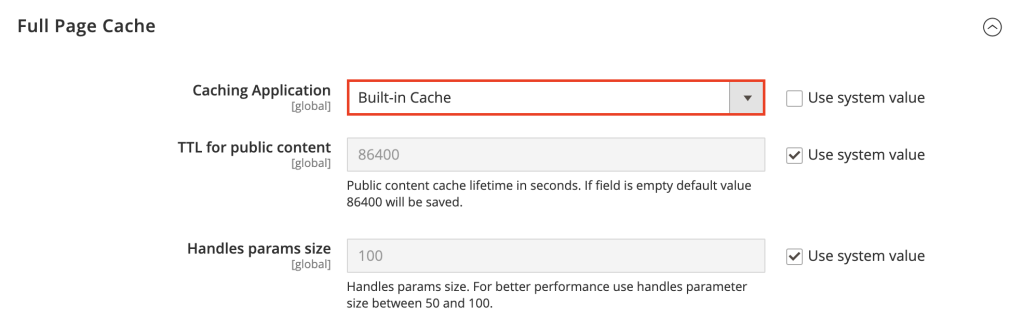
- Save your configurations.
Varnish Cache
Varnish Cache is a web application accelerator that caches dynamic content, such as HTML pages, and serves them quickly to users. Compared to full-page caching, Varnish Cache is more effective because it can handle user-specific pages and real-time data updates.
Remember that you can’t enable full-page and Varnish caching simultaneously, so choose the one that best suits your needs. Here’s the guide for Varnish:
- Set the Caching Application value to Varnish Cache.
- Optionally, enter the appropriate settings in the Varnish Configuration section, such as Access list and Backend ports.

Browser caching
Browser caching stores static files on the user’s local device. When the user revisits your site, these files are loaded from the local cache instead of being downloaded again. Here’s how to activate this caching method:
- Open the .htaccess file in your Magento installation’s root directory.
- Insert these lines to set expiry headers for different types of static content:
<IfModule mod_expires.c>
ExpiresActive On
ExpiresByType image/jpg "access plus 1 year"
ExpiresByType image/jpeg "access plus 1 year"
ExpiresByType image/gif "access plus 1 year"
ExpiresByType image/png "access plus 1 year"
ExpiresByType text/css "access plus 1 month"
ExpiresByType application/pdf "access plus 1 month"
ExpiresByType text/x-javascript "access plus 1 month"
ExpiresByType application/x-shockwave-flash "access plus 1 month"
ExpiresByType image/x-icon "access plus 1 year"
ExpiresDefault "access plus 2 days"
</IfModule>
- Save your edits.
Regardless of the caching technique you configure, it’s a good practice to flush both the Magento and storage caches afterward in the Cache Management page.
9. Optimize your database
Optimizing your Magento database ensures quick access to product and category information. Two effective ways to optimize your database are using flat tables and regularly cleaning outdated data and logs.
Use flat tables for products and categories
Flat tables mean storing product and category data in a single table rather than multiple related tables. This reduces the complexity of database queries, resulting in faster data retrieval.
Below are the steps to enable flat tables for your eCommerce site:
- Navigate to Stores → Configuration → Catalog → Catalog.
- In the Storefront section, set both Use Flat Catalog Category and Use Flat Catalog Product to Yes.
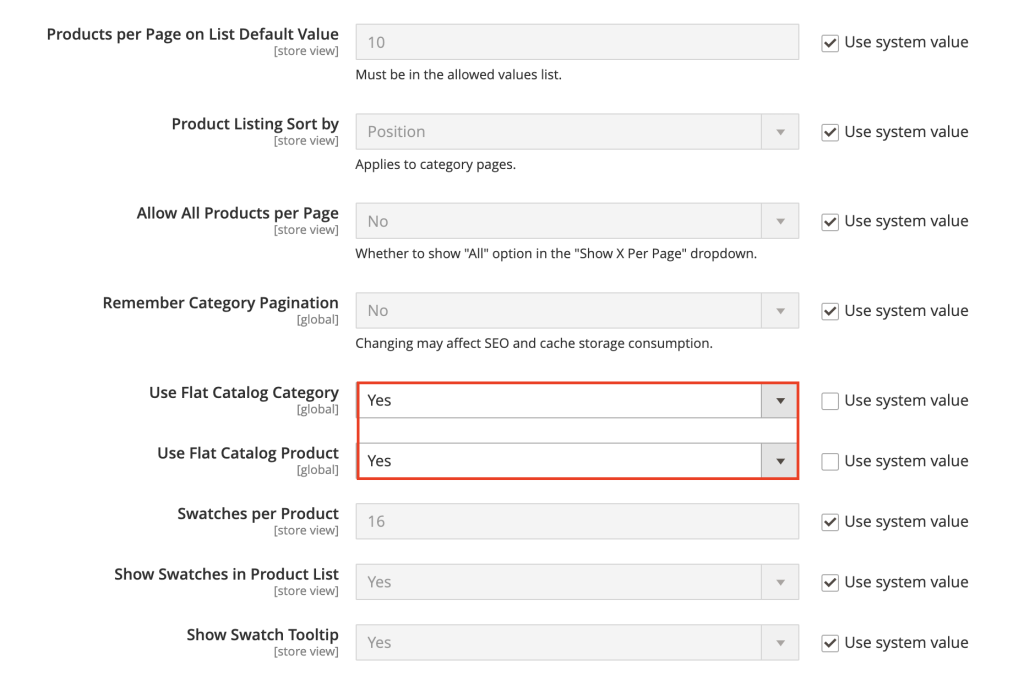
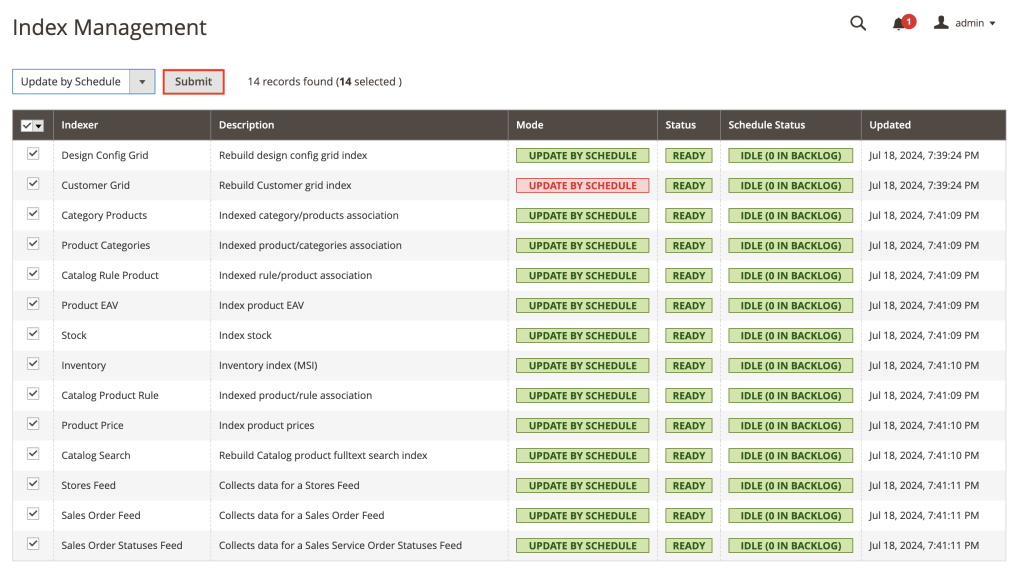
- Save your edits, then go to System → Index Management.
- Check all the indexers and select Update by Schedule from the drop-down menu.
- Hit Submit to reindex data.
Clean outdated data and logs
Cleaning outdated data and logs at least once a month can maintain database performance by preventing it from becoming bloated with unnecessary information. Here’s how to clean them:
- Log in to your server via SSH.
- Access your Magento database with this command, replacing yourusername and yourdatabase with your details:
mysql -u yourusername -p yourdatabasename
- Run these SQL queries to clean up log tables:
TRUNCATE TABLE log_visitor;
TRUNCATE TABLE log_visitor_info;
TRUNCATE TABLE log_url;
TRUNCATE TABLE log_url_info;
TRUNCATE TABLE log_quote;
TRUNCATE TABLE report_viewed_product_index;
TRUNCATE TABLE report_compared_product_index;
TRUNCATE TABLE report_event;
- Execute the following to defrag your tables and improve performance:
OPTIMIZE TABLE sales_flat_order;
OPTIMIZE TABLE sales_flat_order_item;
- Clean up the message queue to maintain efficiency. Adjust the interval as needed to retain recent messages:
DELETE FROM queue_message WHERE created_at < NOW() - INTERVAL 30 DAY;
10. Implement Elasticsearch for improved search performance
Elasticsearch is a powerful search engine that enhances your Magento store’s search functionality and performance. Here are several advantages of using it:
- Relevance. Elasticsearch uses advanced algorithms to deliver more relevant search results, improving customer satisfaction.
- Faceted search. It supports faceted search, allowing visitors to filter search results by price, brand, and category attributes.
- Autocomplete. This search engine provides autocomplete suggestions as users type, making the search experience quicker and more intuitive.
- Speed. Elasticsearch can quickly handle large volumes of data and queries, ensuring that search results are delivered instantly.
Follow these instructions to implement Elasticsearch in Magento:
- Navigate to Stores → Configuration → Catalog → Catalog.
- In the Catalog Search section, select Elasticsearch 7 from the drop-down menu.
- Configure the Elasticsearch server details, such as hostname, server port, and index prefix. The default port for Elasticsearch is 9200.
- Click Test Connection to verify that Magento can connect to Elasticsearch. You should see the “Successful! Test again?” message.

- Save your configurations, then go to System → Index Management to reindex catalog search data.
11. Update the Magento version
Keeping your Magento store up to date has several benefits. Firstly, each new version of Magento includes performance improvements that make your store run faster.
Updates include crucial security patches that protect your store from vulnerabilities and threats. Furthermore, staying updated ensures access to the latest features, enhancing your store’s functionality and user experience.
Follow this guide to update Magento to the latest version safely:
- Create a full backup of your Magento store, including the database and all files, in case anything goes wrong when updating. If you host your site on Hostinger’s VPS, go to Settings → Backup & Monitoring → Snapshots & Backups to create a new one.

- Put your store into maintenance mode to prevent accidental changes during the update:
php bin/magento maintenance:enable
- Access your Magento root directory, then update the platform via Composer:
composer require-commerce magento/product-community-edition --no-update
composer update
- Execute these commands to complete the update:
php bin/magento setup:upgrade
php bin/magento setup:di:compile
php bin/magento setup:static-content:deploy -f
- Once the update is complete, turn off maintenance mode:
php bin/magento maintenance:disable
- Verify your store’s front and back end to ensure everything functions correctly. If necessary, clear the cache via the Cache Management menu.
12. Optimize server-side configurations
In addition to updating your Magento version, you must optimize server configurations to maintain your site’s overall stability and security. This includes regularly updating necessary components like PHP and MySQL and using the HTTP/2 protocol.
Use the latest PHP and MySQL versions
Here’s how to update PHP and MySQL to their latest versions:
- Check the current PHP version:
php -v
- Update the package list and install the latest PHP version:
sudo apt update
sudo apt install php
- Ensure all necessary extensions are installed:
sudo apt install php-common php-mysql php-curl php-xml php-gd php-mbstring
- Verify the current MySQL version and update it:
mysql --version
sudo apt install mysql-server
Consider HTTP/2
HTTP/2 is the latest version of the HTTP protocol and offers several advantages for your eCommerce store:
- Faster load times. HTTP/2 allows multiple requests to be sent for data in parallel over a single TCP connection, reducing latency.
- Improved security. It requires encryption with HTTPS, enhancing data transmission’s security.
- Better compression. This protocol supports header compression, reducing the overhead of data packets.
Here’s how to enable HTTP/2 for Apache servers:
- Enable the HTTP/2 module:
sudo a2enmod http2
- Open the Apache configuration file:
sudo nano /etc/apache2/sites-available/000-default.conf
- Add the following configuration:
<VirtualHost *:443>
Protocols h2 http/1.1
...
</VirtualHost>
- Restart Apache to apply the changes:
sudo systemctl restart apache2
For NGINX servers, follow these steps instead:
- Use nano to edit the NGINX configuration file:
sudo nano /etc/nginx/nginx.conf
- Add these lines to this file:
server {
listen 443 ssl http2;
...
}
- Restart NGINX to update the configurations:
sudo systemctl restart nginx
13. Analyze and monitor Magento store’s performance
Lastly, regularly check your Online store’s performance using the tools mentioned below and apply improvements based on the data collected to maintain optimal site speed and user experience.
Performance tools
Performance monitoring tools help you track your Magento store’s speed and efficiency. They provide valuable insights into how your site performs under different conditions and help identify areas that need improvement.
Some website speed test tools you can use include:
- Google PageSpeed Insights. Google’s official tool to help you make web pages load faster by analyzing your website content and providing suggestions. It measures mobile and desktop performance.
- GTmetrix. This tool provides a detailed report on your site’s performance, including page load time, total page size, and the number of requests. It also offers actionable recommendations to improve speed.
- New Relic. An advanced performance monitoring tool that offers real-time insights into your server’s performance, including database and application monitoring. It helps identify bottlenecks and optimize server response time.
Regular audits
Conducting regular audits helps you maintain optimal website performance. It ensures that any issues affecting speed and user experience are identified and resolved promptly.
Here are general steps to audit your eCommerce site and apply improvements:
- Utilize the previously mentioned tools to gather data on your site’s performance.
- Analyze the generated reports to identify problems such as slow page load times, large image sizes, or inefficient coding practices.
- Prioritize the issues that need immediate attention. Focus on the changes that will have the most significant impact on performance.
- Start applying the necessary improvements based on the prioritized problems.
- Use the performance tools again to test the changes. Ensure the issues have been resolved and your site’s performance has improved.
- Record the problems identified, the improvements made, and the results achieved. This documentation will be helpful for future audits.
Conclusion
In this article, we covered numerous strategies to speed up Magento stores. Choosing a reputable hosting provider and CDN service can significantly improve loading speed and server response time because they ensure necessary resources and reduce latency.
Meanwhile, implementing Elasticsearch and optimizing your database contribute to quicker search results and data retrieval. Additionally, regularly updating your Magento version and using performance tools can help maintain optimal speed and security.
By following these tips, your eCommerce site can expect higher customer satisfaction and conversion rates. We hope this article has been helpful. If you have questions or want to share additional tips, feel free to use the comment section below.
Magento performance optimization FAQ
Why is Magento performance optimization important?
Performance optimization in Magento is important because it impacts user experience and conversion rates. A well-optimized eCommerce store can handle more traffic efficiently, prevent downtime during peak periods, and provide an enjoyable shopping experience.
How can I make Magento faster?
To make your Magento website faster, use a reliable hosting provider, enable Varnish Cache, optimize uploaded images, implement Elasticsearch, and update to the latest Magento version. Regular performance audits using tools like GTmetrix can also help.
Can extensions or modules affect Magento performance?
Yes, poorly coded or unnecessary third-party extensions can slow down Magento. To avoid performance degradation, regularly review and turn off unused extensions and ensure all installed ones are well-coded and optimized for performance.

Ariffud is a Technical Content Writer with an educational background in Informatics. He has extensive expertise in Linux and VPS, authoring over 200 articles on server management and web development. Follow him on LinkedIn.