The basics of Python web scraping
Web scraping is a valuable skill. It allows you to collect and analyze large amounts of data from web pages with almost no manual effort through automatic extraction. Python is a top choice for this task due to its beginner-friendly syntax and ready-to-use modules, which make it easy to write web scraping scripts.
In this article, we will share a step-by-step guide on Python web scraping using an Ubuntu VPS.
Prerequisites
To follow along with this Python web scraping tutorial, you will need:
- An Ubuntu VPS with Python pip and venv module installed.
- Secure Shell (SSH) access to the VPS.
- Basic knowledge of how to run commands on a terminal.
While you can technically write Python code for web scraping without using a Virtual Private Server (VPS), We recommend using one, especially for beginners. With its dedicated resources, a VPS hosting plan will provide more stability and better performance for web scraping, especially for large-scale tasks. For example, if your script is taking too long to execute on your local machine or consuming too much memory, you can switch to a VPS to ramp up your scraping power.

How to web scrape with Python
Follow these steps to set up your first web scraping project.
Setting up your environment for Python web scraping
Start by logging in to your VPS via SSH. You can use a SSH client, like PuTTY for this purpose.
Simply download and install PuTTY, launch it, enter the IP address of your VPS, and then log in using your credentials. If you are a Hostinger user, you can find your VPS login credentials by navigating to hPanel → VPS → Manage → SSH access.
Once you are logged in, run these commands in order.
The first will create a new virtual environment for Python.
python3 -m venv myenv
The below command activates the virtual environment. In other words, you are now inside your own virtual environment and ready to start.
source myenv/bin/activate
The last command installs Beautiful Soup, which is one of the most popular Python web scraping libraries. It will load the requests package for sending HTTP requests.
pip install requests beautifulsoup4
Making your first request
Python’s requests library provides a user-friendly interface ideal for interacting with web servers through HTTP requests. To make our first request, let’s start with a simple Python script – a file containing Python code that can be executed to perform specific tasks.
Our script will use the requests library to send an HTTP GET request and print the HTML response.
You can use the touch command to do so:
touch temp.py
Open the file in your favorite editor, paste the following code into it, and then save it.
import requests

# Send a GET request to the URL

response = requests.get('https://www.hostinger.com/tutorials/how-to-run-a-python-script-in-linux')

# Print the HTML content of the page

print(response.text)
Now, run the script with this command:
python3 temp.py
After running the command, you should see a large amount of HTML content printed on your console.
Extracting data with Beautiful Soup
Now that we have a basic idea of how HTTP requests and responses work let’s see how we can extract some data from the retrieved response object. For this purpose, we will use Beautiful Soup. This Python library parses HTML content and HTML data into a tree-like structure, making it easy to navigate and extract specific information.
Use the following command to create a new script named scraping.py.
touch scraping.py
Open the file in your favorite editor and paste the following code to it:
import requests

from bs4 import BeautifulSoup

# Send a GET request to the URL

response = requests.get('https://www.hostinger.com/tutorials/how-to-run-a-python-script-in-linux')

# Parse the HTML content using BeautifulSoup

soup = BeautifulSoup(response.text, 'html.parser')

# Find all elements with a specific tag (e.g. all h2 headings)

titles = soup.find_all('h2')

# Extract text content from each H2 element

for title in titles:

print(title.text)
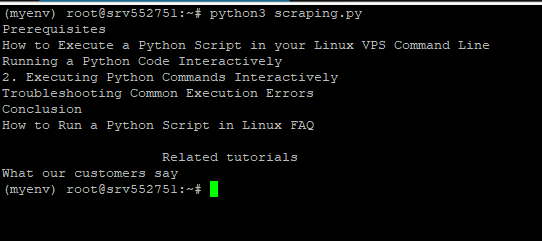
In this code, we are sending an HTTP GET request to the same URL and parsing the HTML content using Beautiful Soup. Then, we will use the find_all function to retrieve all H2 headings from the parsed content. Finally, we need to print the text content for each H2 heading.
Run this command to execute the script:
python3 scraping.py
On your console, you should see a list of all H2 headings from the visited URL, like in the image below.
Parsing HTML and navigating the DOM tree
We’ve now seen how Beautiful Soup extracts data by finding specific elements. However, websites often have complex structures, and you may need to navigate much deeper to reach the information you need. This is why it’s important to understand how the Document Object Model (DOM) works, and how you can traverse it and retrieve data using BeautifulSoup.
The DOM represents an HTML document, the core of all web data, as a tree structure, where elements like <div>, <h1>, and <p> are nodes with parent-child relationships. We can use Beautiful Soup functions to traverse this tree and locate specific website data points.
To explore the concept in more depth, we will update our scraping.py script to locate different structures inside the HTML. Replace the contents of the scraping.py file with this code.
Before we run this code, however, let’s explore what different parts of it are doing. This will help you better understand the fundamentals of web scraping in Python.
The below section of this code allows us to import the required libraries, send a GET request, and parse the HTML elements to respond to it:
import requests

from bs4 import BeautifulSoup

# Send a GET request to the URL

response = requests.get('https://www.hostinger.com/tutorials/how-to-run-a-python-script-in-linux')

# Parse the HTML content using BeautifulSoup

soup = BeautifulSoup(response.text, 'html.parser')
Next, this portion is used to retrieve the first <h1> tag in the HTML document, and then print the text inside it:
# Find the first <h1> tag

first_header = soup.find('h1')

print('First <h1> tag text:', first_header.text)
Now, we find all the <a> tags, i.e. links, in the HTML documents and store them in the all_links list. Then, we run a for loop to iterate through each link and print the href attribute of each <a> tag.
# Find all <a> tags (links)

all_links = soup.find_all('a')

print('All <a> tag hrefs:')

for link in all_links:

print(link.get('href'))
We are ready to extract the <a> HTML tags from the list of links, and then print the text and href attribute together. This demonstrates how you can dig deep into a particular attribute, HTML string, or HTML element if you desire, perfectly demonstrating how web scraping can be of use for analyzing data.
# Access attributes of an element

first_link = all_links[0]

print('First link text:', first_link.text)

print('First link href:', first_link.get('href'))
Lastly, the if statement checks if we were able to find the first header in part 2. Then, we get the parent HTML element of the first <h1> tag and print its name. Finally, we find the next sibling of the first <h1> tag and print its name. If there is no next sibling, “no next sibling” will be printed. This demonstrates how you can navigate through different levels of the DOM tree, such as moving to parent elements and sibling elements.
# Navigate using parent and siblings

if first_header:

parent_element = first_header.parent

print('Parent of first <h1> tag:', parent_element.name)
C div exists as an HTML element. If it does, it finds the first <span> child element inside this <div> and prints its text. If the div is not found, it logs a message on the screen to indicate that. This demonstrates how you can navigate the DOM tree to locate specific elements and extract their content.
# Navigate the DOM tree

# Example: Find a div with a specific class, then find a child element

specific_div = soup.find('div', class_='d-flex')

if specific_div:

child_element = specific_div.find('span')

if child_element:

 print('Text of child <span> in specific div:', child_element.text)

else:

print('Div with class "d-flex" n

next_sibling = first_header.find_next_sibling()

print('Next sibling of first <h1> tag:', next_sibling.name if next_sibling else 'No next sibling')
Now, you execute the .py file script via this command:
python3 scraping.py
Expect an output like this:
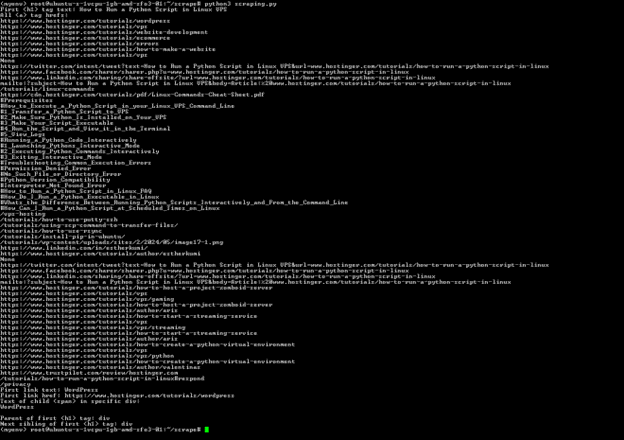
The output above shows:
- The H1 tag.
- All the <a> tags.
- The text and link of the first <a> tag.
- Text of the child element of a div with a specific class.
- The parent and sibling of the first H1 tag.
For your reference, this is the complete code to paste over, with all functions included:
import requests

from bs4 import BeautifulSoup

# Send a GET request to the URL

response = requests.get('https://www.hostinger.com/tutorials/how-to-run-a-python-script-in-linux')

# Parse the HTML content using BeautifulSoup

soup = BeautifulSoup(response.text, 'html.parser')

# Find the first <h1> tag

first_header = soup.find('h1')

print('First <h1> tag text:', first_header.text)

# Find all <a> tags (links)

all_links = soup.find_all('a')

print('All <a> tag hrefs:')

for link in all_links:

print(link.get('href'))

# Access attributes of an element

first_link = all_links[0]

print('First link text:', first_link.text)

print('First link href:', first_link.get('href'))

# Navigate the DOM tree

# Example: Find a div with a specific class, then find a child element

specific_div = soup.find('div', class_='d-flex')

if specific_div:

child_element = specific_div.find('span')

if child_element:

 print('Text of child <span> in specific div:', child_element.text)

else:

print('Div with class "d-flex" not found')

# Navigate using parent and siblings

if first_header:

parent_element = first_header.parent

print('Parent of first <h1> tag:', parent_element.name)

next_sibling = first_header.find_next_sibling()

print('Next sibling of first <h1> tag:', next_sibling.name if next_sibling else 'No next sibling')
Storing scraped data
After scraping all the data you need, you’ll often need to store it for later use. Two common ways to store scraped data are by saving it to a CSV file or a database, like MongoDB. We’ll update our script to use both.
First, install the pymongo library by running the following command. This library will be used to write the web scraping data you have collected to a MongoDB instance.
pip install pymongo
Next, add the following code to the top of your scraping.py file. This code imports the libraries we will use to write to a CSV file and a MongoDB instance.
import csv

from pymongo import MongoClient

import sys
Now, add the following to the end of your scraping.py file.
In the below Python code, we are creating an object data_to_store that contains all the data we want to store in a CSV file and a MongoDB database.
Then, we use the CSV library to write the data over to a new CSV file. Finally, we use the MongoClient object to connect to a local MongoDB database and write the data to the scraped_data collection.
# Extracting data for storing

data_to_store = {

'First_h1_tag': first_header.text,

'First_link_text': first_link.text,

'First_link_href': first_link.get('href')

}

# Storing data to a CSV file

csv_file = 'scraped_data.csv'

with open(csv_file, 'w', newline='', encoding='utf-8') as file:

writer = csv.DictWriter(file, fieldnames=data_to_store.keys())

writer.writeheader()

writer.writerow(data_to_store)

print('Data saved to CSV file:', csv_file)

# Storing data to MongoDB

try:

client = MongoClient('mongodb://localhost:27017/')

db = client['scraping_db']

collection = db['scraped_data']

collection.insert_one(data_to_store)

print('Data saved to MongoDB collection: scraped_data')

except Exception as e:

print('Error:', e)

print('Failed to connect to MongoDB. Exiting...')

sys.exit(1)
Note that you can connect to a remote MongoDB instance too by replacing the URL above. You may also specify different names for the MongoDB database and collection.
If you don’t have a running MongoDB instance, the code will still work because we have added a try-except block to handle errors.
Lastly, execute the script by running this command:
python3 scraping.py
Upon successful execution, you should see the following lines at the bottom:
Data saved to CSV file: scraped_data.csv

Data saved to MongoDB collection: scraped_data
If you don’t have a MongoDB database running, you should see an error on the terminal indicating that the data couldn’t be saved to the MongoDB database. However, the CSV file should still be generated. To display its contents, run the following command:
cat scraped_data.csv
The output should look like this:

Using regular expressions to scrape data
Regular expressions (regex) are a powerful tool for pattern matching and can be very useful in web scraping when you need to extract data that follows a specific pattern. Let’s walk through an example to illustrate how you can combine Beautiful Soup and regular expressions to scrape data.
Create a new file named regex.py and paste the following code to it:
import requests

from bs4 import BeautifulSoup

import re

# Send a GET request to the URL

response = requests.get('https://webscraper.io/test-sites/e-commerce/static/phones')

# Parse the HTML content using BeautifulSoup

soup = BeautifulSoup(response.text, 'html.parser')

# Define a regex pattern for matching email addresses

email_pattern = re.compile(r'[a-zA-Z0-9._%+-]+@[a-zA-Z0-9.-]+\.[a-zA-Z]{2,}')

# Find all text in the HTML that matches the email pattern

emails = soup.find_all(string=email_pattern)

# Print all matched email addresses

for email in emails:

print(email)

# Define a regex pattern for matching URLs containing 'commerce'

url_pattern = re.compile(r'.*commerce.*')

# Find all <a> tags with href attributes matching the URL pattern

links = soup.find_all('a', href=url_pattern)

# Print all matched URLs

for link in links:

print(link['href'])
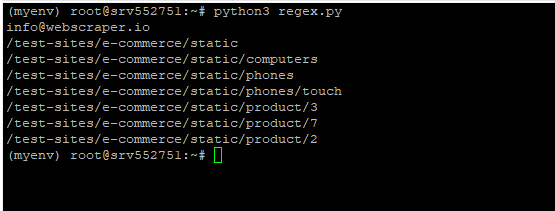
In the above code, we are defining a regular expression (r'[a-zA-Z0-9._%+-]+@[a-zA-Z0-9.-]+\.[a-zA-Z]{2,}‘) for email addresses, and then using that regular expression to find all email addresses in the page.
Then, we define another regular expression (r’.*commerce.*’) that finds all <a> tags in the HTML containing the word commerce.
Execute the script by running this command:
python3 regex.py
The output should show an email address, followed by all the links that contain commerce. Like this:
Handling dynamic content and Ajax calls
When web scraping, you may notice dynamic content that’s loaded via AJAX calls or JavaScript. This dynamic content may not be present in the initial HTML response, because it will only show after the page first loads. In this section, we’ll explore how to handle these scenarios.
Handling dynamic data using Selenium
Selenium is an open-source tool for automating web browsers. It can execute JavaScript code, wait for content to load dynamically, and then scrape and retrieve the data you need. The Python library for Selenium can be downloaded by running this command:
pip install selenium
Here’s a sample Selenium script that waits for a specific element to load before extracting desired data:
from selenium import webdriver

from selenium.webdriver.common.by import By

from selenium.webdriver.support.ui import WebDriverWait

from selenium.webdriver.support import expected_conditions as EC


# Define the URL to scrape

url = 'https://www.example.com' # Replace with the target website


# Create a new WebDriver instance

driver = webdriver.Chrome('/path/to/chromedriver') # Replace with your WebDriver path


# Navigate to the URL

driver.get(url)


# Explicit wait for content to load (adjust wait time as needed)

WebDriverWait(driver, 10).until(EC.presence_of_element_located((By.ID, 'unique_element_id')))

# Locate and extract the desired data using Selenium methods

view_details_buttons = driver.find_elements(By.CLASS_NAME, 'view_details_button')

# Close the browser window

driver.quit()
Handling dynamic data by analyzing network requests
Another way to manage dynamic data is by inspecting network requests in your browser’s developer tools to identify the AJAX requests used. You can then mimic these requests in your scraping script using the requests library.
Error handling and logging
Error handling and logging techniques are crucial for writing effective scraping scripts. Websites are dynamic and will change their structure or behavior over time. Additionally, network issues, server-side errors, and unexpected data formats can all lead to unexpected behavior in your scraping script.
When you implement proper error handling and logging, you will be able to gracefully handle errors or exceptions and prevent your script from crashing. Moreover, your code becomes more readable and easier to maintain. You can also quickly identify potential problem areas and adjust your script as needed.
Here’s how you can go about implementing error handling and logging during web scraping:
- Import the logging module by adding the following line to the top of your script:
import logging
- Set up logging by adding this line:
logging.basicConfig(level=logging.INFO, format='%(asctime)s - %(levelname)s - %(message)s')
- Wrap network requests within try-except blocks. This ensures that if an HTTP request fails, the proper error is logged and the script gracefully exits (instead of crashing).
try:

# Send a GET request to the URL

response = requests.get('https://www.hostinger.com/tutorials/how-to-run-a-python-script-in-linux')

response.raise_for_status() # Raise HTTPError for bad responses

except requests.RequestException as e:

logging.error(f"Request failed: {e}")

sys.exit(1)

# Parse the HTML content using BeautifulSoup

soup = BeautifulSoup(response.text, 'html.parser')
- Handle potential errors and exceptions in parsing and data extraction. This will help you identify the tags/elements the script was unable to fetch.
try:

# Find the first <h1> tag

first_header = soup.find('h1')

if first_header:

 print('First <h1> tag text:', first_header.text)

else:

logging.warning('No <h1> tag found')

except Exception as e:

logging.error(f"Error finding first <h1> tag: {e}")

try:

# Find all <a> tags (links)

all_links = soup.find_all('a')

if all_links:

print('All <a> tag hrefs:')

 for link in all_links:

print(link.get('href'))

else:

logging.warning('No <a> tags found')

except Exception as e:

logging.error(f"Error finding <a> tags: {e}")
- If ever you are unable to find the root cause of an issue, you can enable interactive debugging via Python’s built-in debugger, pdb.
import pdb; pdb.set_trace()

# Your code here
Creating a simple web scraper application
Now that we have explored how to extract data, navigate a DOM, use regular expressions to retrieve filtered data, and implement error handling, let’s create a simple web scraper application in Python. Here’s how it will work:
- It will take a keyword and a URL as input.
- It will calculate the number of times the keyword exists in the page text.
- It will also display all the internal links present in the text.
In our code, we will create functions for getting the HTML (get_html), counting keywords (count_keyword), finding all external links (find_external_links), and a main function that prompts the user for inputs and calls all the other functions. The code will also implement proper error handling, so if anything fails in your web scraping efforts, the user will be shown the exact error on their terminal.
Use the following command to create a new file named app.py:
touch app.py
Then, open it in your favorite editor and paste the following code to it.
import requests

from bs4 import BeautifulSoup

import re

from urllib.parse import urlparse

# Function to get HTML content from a URL

def get_html(url):

try:

 response = requests.get(url)

 response.raise_for_status()

 return response.text

except requests.exceptions.RequestException as e:

 print('Error fetching the URL:', e)

 return None

# Function to count keyword occurrences

def count_keyword(html, keyword):

keyword = keyword.lower()

text = BeautifulSoup(html, 'html.parser').get_text().lower()

return text.count(keyword)

# Function to find all external links

def find_external_links(html, base_url):

soup = BeautifulSoup(html, 'html.parser')

links = soup.find_all('a', href=True)

external_links = []

parsed_base_url = urlparse(base_url)

base_domain = parsed_base_url.netloc

for link in links:

 href = link.get('href')

 parsed_href = urlparse(href)

 # If the link is external (different domain)

 if parsed_href.netloc and parsed_href.netloc != base_domain:

 external_links.append(href)

return external_links

# Main function

def main():

keyword = input("Enter the keyword: ")

url = input("Enter the URL: ")

html = get_html(url)

if html is None:

 print('Failed to retrieve HTML content.')

 return

keyword_count = count_keyword(html, keyword)

external_links = find_external_links(html, url)

print(f"\nKeyword '{keyword}' found {keyword_count} times in the page.")

print("\nExternal Links:")

for link in external_links:

 print(link)

if __name__ == "__main__":

main()
Use the following command to run the script:
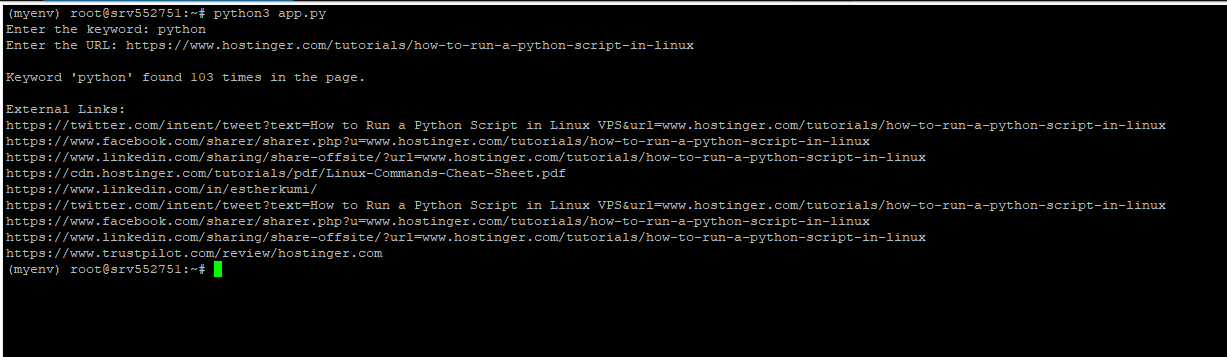
python3 app.py
When prompted, enter the keyword and the URL you want to use. Here’s the output we got after passing python and https://www.hostinger.com/tutorials/how-to-run-a-python-script-in-linux as the input parameters:
Conclusion
Web scraping is a great way to process, analyze, and aggregate large volumes of online data. In this article, we learnt how to make your first request in Python, use BeautifulSoup to extract data, parse HTML and navigate the DOM tree, leverage regular expressions to scrape data, handle dynamic content, and store scraped data in a file and database. We hope you have found it useful.
Python web scraping FAQ
Which Python libraries are commonly used for web scraping?
The Python libraries most commonly used for web scraping are Beautiful Soup, requests, and Scrapy.
Is it possible to scrape websites that require login credentials using Python?
It is technically possible to scrape websites that require login credentials using web scraping. However, you may need to replicate the login process, which can be complex. For example, you may need to handle CAPTCHAs, multi-factor authentication, or other security measures. Before you proceed, make sure that web scraping doesn’t violate the website’s terms of service.
Can I extract images or media files with Python web scraping?
Yes, you can extract multimedia files from websites using Python web scraping. Here’s a simplified overview of the process:
1. Retrieve the HTML of the relevant page.
2. Use BeautifulSoup to find the appropriate HTML tag, e.g. <img> for images.
3. Extract the URL of the image/media file from the tag.
4. Use the requests library to download the image/media file using its URL.
Web scraping vs. API: which is better?
Both web scraping and APIs have their merits, and the better choice depends on your specific needs. If an API is available, and offers the data you need in a structured format, it’s generally the preferred option due to its ease of use and standardization. However, if you need specific data, and the website doesn’t offer an API, web scraping may be your only option.

Valentinas Čirba is a VPS Product Manager. His physics degree and 10+ years of experience in the software industry make him an expert in virtualization and cloud technologies. He is passionate about making complex things simple for end users. When he's not working, Valentinas likes to spend time with his family and friends. He also enjoys playing chess and doing crossword puzzles.
