How to host a dedicated Garry’s Mod server (2 effective methods)
Since Garry’s Mod (GMod) is a sandbox game without any objective, it can get boring over time if you are playing alone. To make it more interesting, set up a dedicated multiplayer server where you can invite and have fun with friends.
In this article, we will explain how to host a GMod server using two methods – Hostinger Game Panel and manually. Since both have the same outcome but differ in difficulty, choose one that suits your preferences.
Prerequisites
To set up a private Garry’s Mod host, you need a virtual private server (VPS) with sufficient resources. While there are no official minimum requirements, we recommend a system with at least a multi-core CPU, 4 GB of RAM, and 10 GB of storage space.
You must be able to access the server remotely using an SSH client like PuTTY or Terminal. You should also ideally understand basic Linux commands and system management.
Alternatively, use Hostinger Game Panel hosting, which lets you easily install and maintain a dedicated server for various games without commands. We will explain how to do so in the next section.
Should you need to use commands, our VPS AI assistant, Kodee, can write them quickly with simple prompts. Using the Browser terminal feature, you can also easily connect to Hostinger game servers via a web browser.

How to make a GMod server using Hostinger Game Panel
Hostinger Game Panel lets you easily set up and manage a dedicated server for various games without commands. In addition to saving time, this method is safer since you won’t run the wrong utilities that might cause errors.
After purchasing a plan, complete the onboarding tasks, like setting up a new password and selecting a data center. Since we provide multiple VPS locations across the globe, choose the closest one to your player base to minimize latency.
Since Hostinger Game Panel hosting is instantly ready after the onboarding, you can immediately install a Garry’s Mod host by following these steps:
- Log in to hPanel and click VPS at the sidebar.
- From the list, click Manage on your Game Panel hosting.
- In the VPS Overview menu, click Manage panel.

- Once the login page opens, enter the account details and hit Login. You can obtain this information from the previous Overview menu.
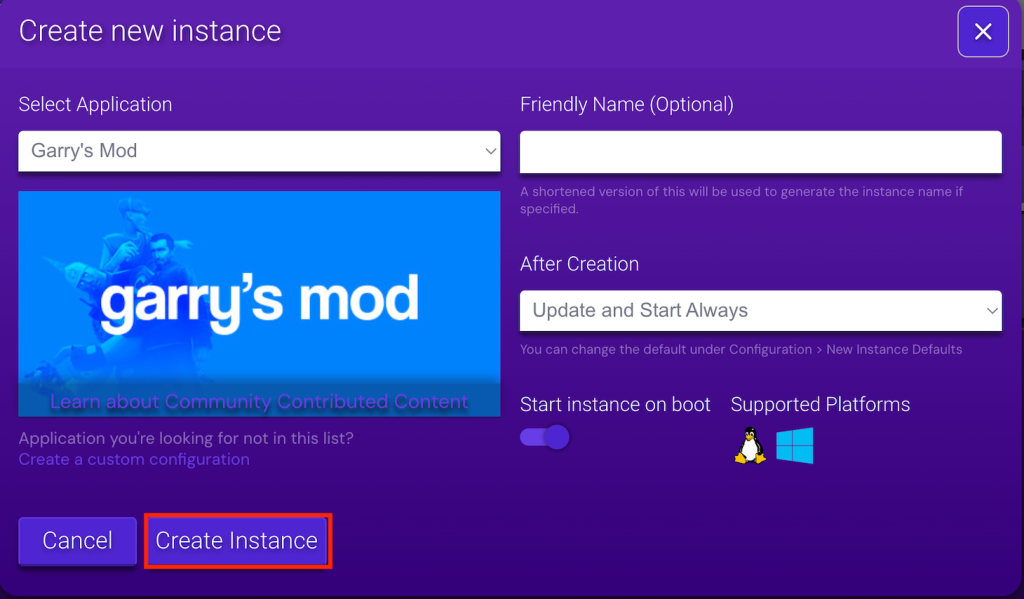
- Click Create new instance.
- Select Garry’s Mod from the application drop-down list and hit Create Instance.
- Double-click the new instance and head to Configurations → Security and Privacy → Generic Config.
- From the Server IP Address menu, select the one with eth0. We recommend the IPv4 address like 185.185.185.185.
- Head back to your instance and hit Start.
That’s it! During the first launch, wait until Game Panel finishes downloading the component files. This process should take a few minutes, depending on your internet connection.
Once ready, let’s connect to your Garry’s Mod dedicated server. Here are the steps:
- Double-click your Garry’s Mod instance and obtain the endpoint from the Connection info section.
- Open the Steam client and start Garry’s Mod.
- Hit the tilde (~) button on your keyboard to open the command console.
- Enter the following command. Replace the IP address and port number with your endpoint.
connect 185.185.185.185:27015
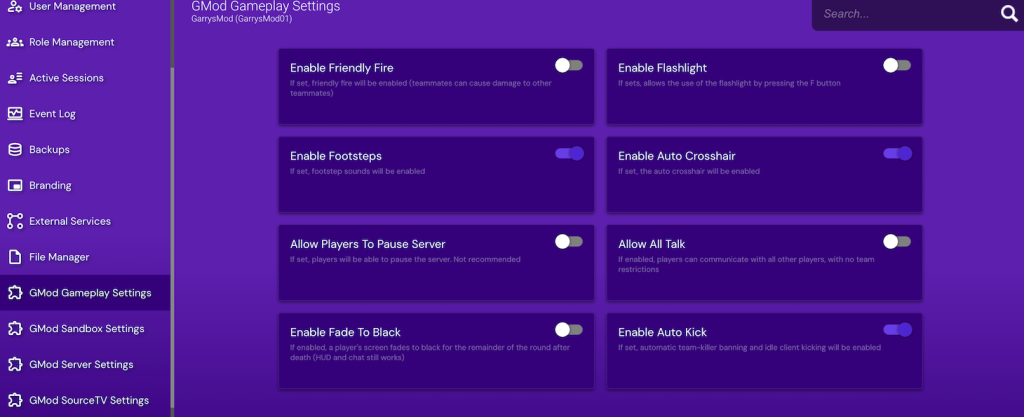
To change server settings, double-click your Garry’s Mod instance → Sidebar → Configuration. In the Hostinger Game Panel, you can do so easily without commands.
How to manually host a Garry’s Mod server
Hosting a GMod server manually is more complicated than using our Game Panel. However, you might prefer this method if you want to use different software or operating systems. In this tutorial, we will use Debian 12.
1. Connect via SSH and create a user
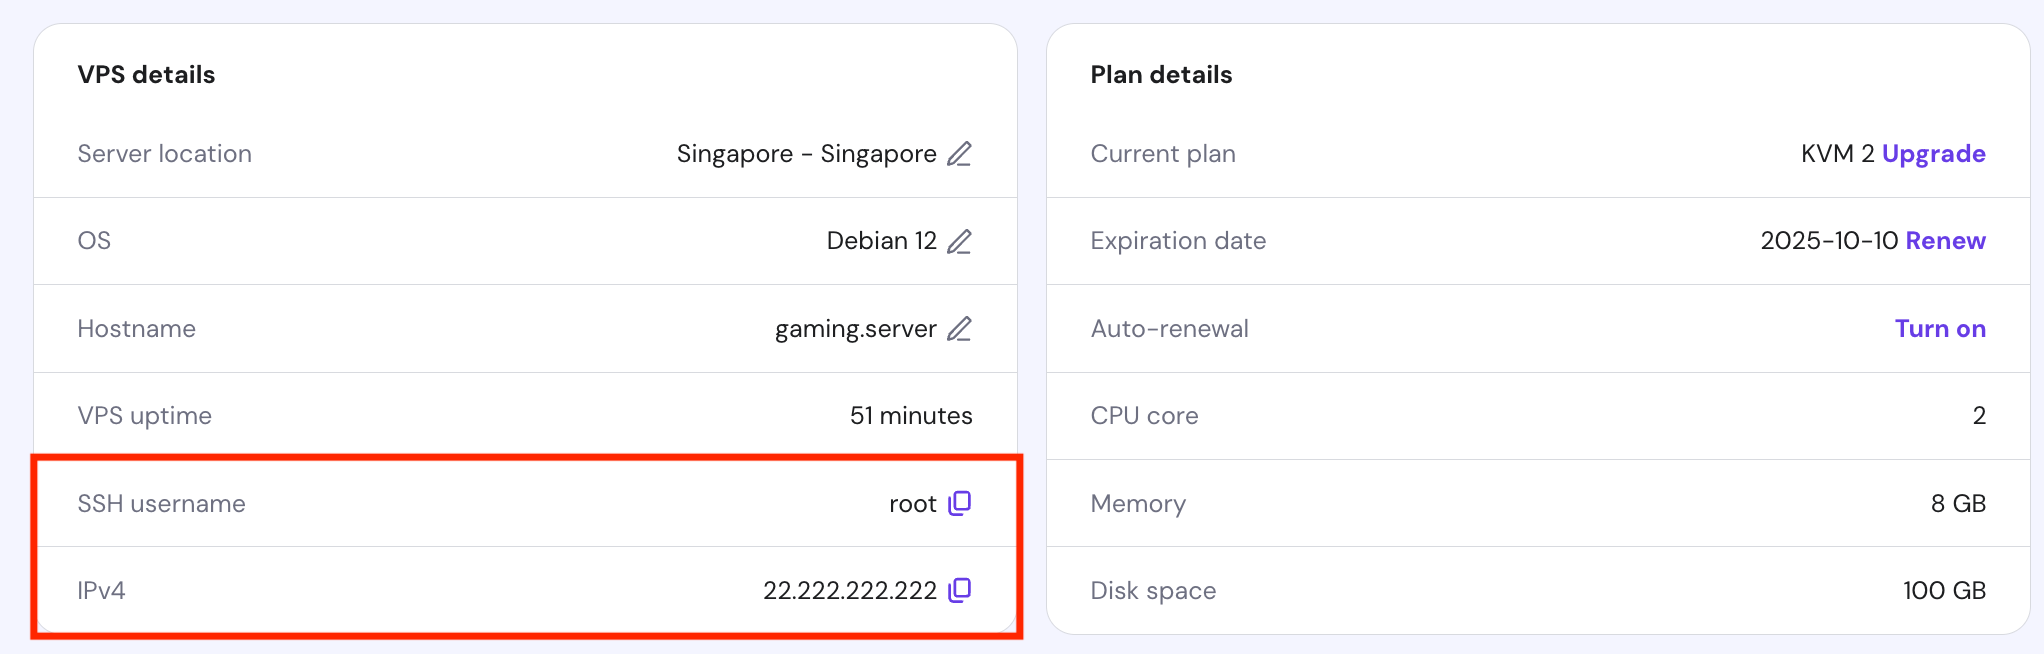
Before installing a Garry’s Mod server, connect to your VPS using PuTTY, Terminal, or Browser terminal. At Hostinger, you can obtain the SSH login credentials by going to hPanel → VPS → Manage. The information is located in the VPS details section at the bottom of your VPS Overview page.
By default, you will log in as root, who can run any administrative command without confirmation. Using this user might be risky since you are more prone to run the wrong utilities by accident, potentially causing misconfiguration issues.
To minimize the risk of accidental execution, use a superuser. Such an account requires the sudo prefix and its password to run administrative commands.
In this tutorial, we will create the gmod-admin superuser using this command:
adduser gmod-admin
Enter a new password and other account details. Now, add the new user to the sudo group to grant it the permissions to run administrative commands:
usermod -a -G sudo gmod-admin
Switch to the new user using the following command:
su gmod-admin
Once logged in, your command line should change to the new username. Since you are still in the root account’s home directory, enter cd to switch to the new user’s folder.
2. Download and install SteamCMD
SteamCMD is the command-line interface version of the Steam game client. It enables you to install and update dedicated game server components in an environment without a graphical interface, like a VPS.
Here’s how to install SteamCMD on your Linux system:
- Install the dependencies – software that SteamCMD requires to run properly:
sudo apt install software-properties-common gcc-multilib
- Enable the non-free repository to avoid errors using this command:
sudo add-apt-repository non-free
- Run the following commands subsequently to enable the support for the 32-bit SteamCMD package, avoiding incompatibility issues:
sudo dpkg --add-architecture i386

sudo apt update -y
- Install the SteamCMD client and other complementary libraries using this command:
sudo apt install steamcmd libtinfo5:i386 libncurses5:i386 -y
- Accept the terms and conditions to proceed with the installation.
- Confirm whether the SteamCMD installation was successful by running this command. It might prompt the software to download updates:
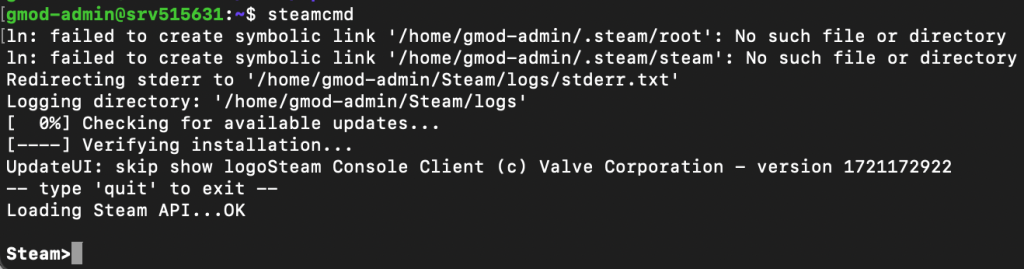
steamcmd
If your command line changes to Steam>, it means SteamCMD is installed and running properly.
3. Download GMod server files
After entering SteamCMD, we can start installing the GMod server components. Here’s how to do so:
- Skip this step if you want to use the default folder. Otherwise, run the following command to force SteamCMD to download the server components in another directory. Replace path/to/dir with your desired path:
force_install_dir path/to/dir
- Connect to the Steam client using this command. You can use another account, but we will do so as an anonymous:
login anonymous
- Download the GMod server files using this command:
app_update 4020
- Wait until the process is complete, which should take a few minutes, depending on your internet connection. Once finished, run this command to exit SteamCMD:
quit
For this tutorial, we didn’t specify a custom installation path. This means SteamCMD downloaded the server components into the default directory, namely Steam/steamapps/common/GarrysModDS.
After the installation, you can also run the app_update command in the SteamCMD shell to update the server components. However, doing so might overwrite existing settings.
4. Configure the server
Before starting the GMod server, we must adjust several settings to ensure its functionality. Start by installing a text editor to edit the configuration file. For this tutorial, we will use Nano:
sudo apt install nano
Check the Nano version to confirm it is installed properly:
nano --version
GMod has several files defining different game and server settings, but we will focus on server.cfg since it is the main one. All of them are in the GarryModDS/garrysmod/cfg directory.
Since we install the server components in the default location, we will open the file using the following command:
sudo nano Steam/steamapps/common/GarrysModDS/garrysmod/cfg/server.cfg
Remember to replace Steam/steamapps/common if you use a custom installation path.
Important! If you encounter an error, check capitalization since Linux commands are case-sensitive.
By default, this file is empty, and you must manually add the parameters. Here are several important settings:
- hostname – the name of your server in the multiplayer room list.
- sv_password – the password for connecting to your server.
- rcon_password – the RCON protocol password that grants admin access to your server.
- sbox_playershurtplayers – toggle for the player vs player mode.
- sbox_maxprops – the limit of props a player can spawn.
Since GMod has plenty of parameters, we recommend generating the configuration using an online tool like YourDevTools’ Garry’s Mod Server.cfg generator. Simply enter your desired value in each field and click Generate Code.
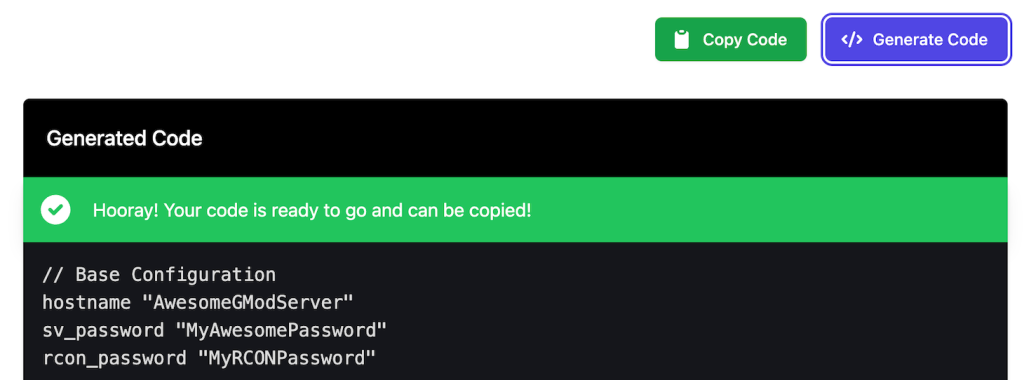
Click Copy Code and paste it to the server.cfg file. Once finished, press Ctrl + X, Y, and Enter to save the changes.
5. Configure firewall
Before running the server, we must open a specific port number – the endpoint that players will use to connect to your GMod host. This game uses anywhere between port 27005 to 27015.
At Hostinger, you can easily do so without commands via hPanel:
- Log in to hPanel and click VPS from the top menu. Click Manage on your VPS.
- Navigate to the sidebar → Settings → Security → Firewall.
- Click the Add Firewall button and enter a name. Click Create.
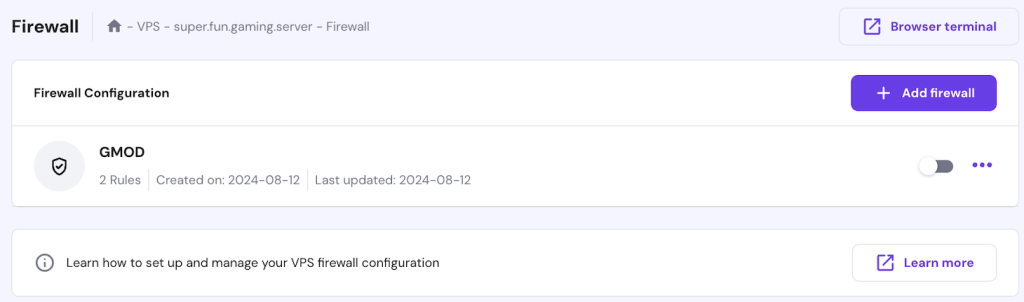
- Click the three-dot icon on your new Firewall configuration and select Edit.
- Add two rules that accept connections from anywhere to port 27005-27015 UDP and TCP.

- Once finished, click the arrow icon on the top left to return to the Firewall menu. Click the toggle → Activate to enable your new firewall rule.
Alternatively, you can forward port using Debian’s Uncomplicated Firewall (UFW). Begin by installing the tool using this command:
sudo apt install ufw -y
Then, open the SSH and your game server ports:
sudo ufw allow 22/tcp

sudo ufw allow 27005:27015/udp

sudo ufw allow 27005:27015/tcp
Enable UFW to apply the rules using the following command. If you have UFW installed already, replace enable with reload:
sudo enable ufw
6. Start your GMod server
Once the configuration process is finished, let’s launch the GMod server. While you can run the server directly from your main command-line shell, it will shut down when you close the SSH connection.
Since it is inconvenient, we recommend starting the GMod server using a Terminal multiplexer like Linux Screen. It keeps your server running in the background even after you disconnect the SSH session. Install the tool using this command:
sudo apt install screen -y
Now, enter the following command to start a new virtual Terminal session:
screen
After entering the virtual session, navigate to your GMod server installation folder using the cd command:
cd Steam/steamapps/common/GarrysModDS
To start the server, you must run the srcds_run script and specify in-game settings. In the following example, we will set the player limit to 12 and use the flatgrass map:
./srcds_run -game garrysmod +maxplayers 12 +map gm_flatgrass
Important! Avoid using root to start your game server since it might expose the account to the public internet, creating a security risk.
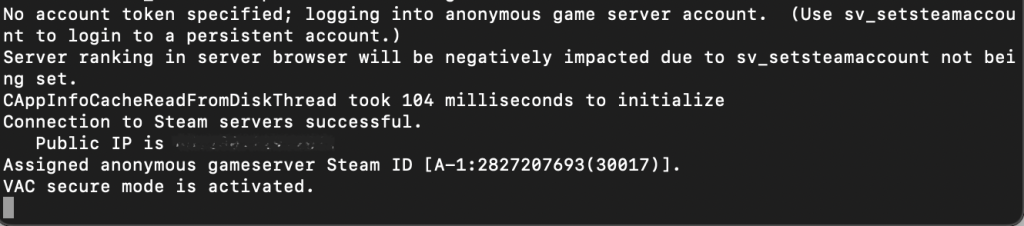
That’s it! If the “VAC secure mode is activated” line appears on your command line, the server is online and running properly. Press Ctrl + A and D to quit the Screen session. If you want to reconnect, enter this command:
screen -r
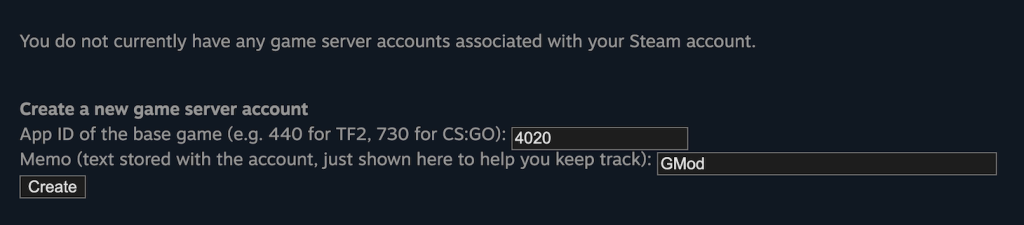
Optionally, you can add your Game Server Login Token (GSLT) during the startup to authenticate the server. Otherwise, GMod will put it at the bottom of the multiplayer room list. You can do so using these steps:
- Log in to the Steam web client.
- Open the Steam game server management page.
- Scroll down to the Create a new game server account section and enter 4020 as the application ID. You can also add a memo for identification.
- Click Create, and the new token will show up on the list.
Now, add the token in your server startup command after the +sv_setsteamaccount flag like this example:
./srcds_run -game garrysmod +maxplayers 12 +map gm_flatgrass +sv_setsteamaccount yourtokengoeshere
Conclusion
Setting up a Garry’s Mod multiplayer server lets you play with friends, making the gameplay more interesting. Otherwise, it might get boring over time since this game doesn’t have any objective.
The easiest way to set up a GMod server is using Hostinger’s Game Panel. After buying our plan, access the panel and create a new Garry’s Mod instance. Wait until it finishes downloading and hit Start.
You can also do so manually using commands. Connect to your VPS via SSH and create a new superuser. Then, install SteamCMD and download the GMod server components via the Steam shell.
Configure the server by editing server.cfg using a text editor like Nano. Open ports 27005 to 27015 via Uncomplicated Firewall or hPanel to allow connection to your GMod host. Finally, start the server in Linux Screen by running the srcds_run script.
How to make a GMod server FAQs
How do I download and install Garry’s Mod server files?
To download Garry’s Mod server files, install SteamCMD and its dependencies like lib32gcc. Then, enter the Steam shell and run the app_update command to fetch the components. If you use Hostinger Game Panel, you can do so in a few clicks by creating and running an instance.
What ports need to be opened on my router for a GMod server?
By default, GMod uses any port between 27005 and 27015. You can use a particular one by adding the -port flag followed by your desired port number in the startup command.
Can mods be installed on a GMod server?
Yes, you can install mods from the GMod workshop page and third-party sources like NexusMods. You can install workshop add-ons by specifying the item ID in the startup command after the +host_workshop_collection flag. For third-party ones, add them to respective folders depending on whether they are maps or add-ons.

Aris is a Content Writer specializing in Linux and WordPress development. He has a passion for networking, front-end web development, and server administration. By combining his IT and writing experience, Aris creates content that helps people easily understand complex technical topics to start their online journey. Follow him on LinkedIn.