How to create a Django project
Creating a Django project is the first step in harnessing the power of this popular web framework. Known for its “batteries-included” philosophy, Django provides developers with a comprehensive set of tools for tasks like user authentication, content administration, and database management.
This combination of features makes Django a favorite for building dynamic, data-driven websites and applications.
In this tutorial, we’ll guide you through the process of setting up and creating your first Django project. Let’s get started!
Prerequisites
Before you start creating your Django project, you’ll need a VPS for your projects. Hostinger’s Django VPS hosting provides an environment specifically tailored to getting your Django projects up and running quickly.
The most popular plan comes with 2 vCPU cores, 8 GB RAM, and 100 GB of NVMe SSD storage, which is suitable for up to a medium-scale Django project.
After purchasing a server to host your project, install Django since we will use its command to set up the project directory. If you use Hostinger’s VPS, you can easily set up the framework by choosing the Django template during the onboarding process.

Also set up a Python virtual environment to isolate your application data from other projects and services in your system.
Creating a new Django project
It’s time to create your first Django app. In this section, you will establish the codebase foundation needed to begin developing your project.
Before proceeding, connect to your server via SSH using PuTTY or Terminal. For Hostinger users, you can access your VPS in one click using Browser terminal by simply clicking the button on your VPS management page.
Once connected, let’s create a new Django project:
- Go to your project directory. If you’re not already in the directory where you want to create the project, use the cd command to navigate there.
- Use Django’s startproject command to create a new project. Replace myproject with the name of your project:
django-admin startproject myproject
The above command would create a new directory named myproject containing the default project structure.
- Then, navigate to your project’s inner folder:
cd myproject/myproject
- Open settings.py using one of the default Ubuntu text editors (nano or vim):
vim settings.py
- Locate the ALLOWED_HOSTS setting and add your VPS IP as follows. This configuration ensures your server can access and serve the Django project:
ALLOWED_HOSTS = ['your_vps_ip']
- Save the changes and quit vim by entering :wq.
- To verify that everything is set up correctly, you can start the Django development server. Return to the parent project category and enter runserver:
cd ..
python manage.py runserver 0.0.0.0:8000
Now, open your browser and go to http://your_vps_ip:8000/ with your_vps_ip being your actual VPS IP. If the setting was correct, you should see the Django welcome page:
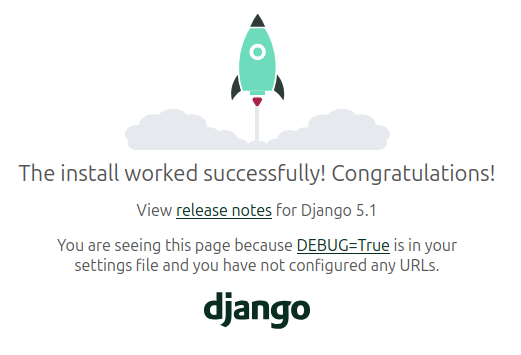
If you followed through with these steps, you successfully built and executed a default Django project on your VPS.
Understanding the Django project structure
Running the startproject command creates a basic Django project structure that includes several key files and directories. Each of them plays a specific role in your Django project. Here’s a breakdown of the structure and the purpose of each component:
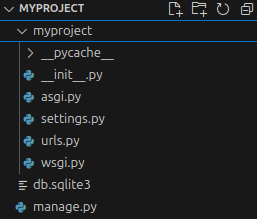
myproject/
The inner project directory containing the core settings, configurations, and other default files for your Django project.
manage.py
This command-line utility lets you interact with your Django project. You use it for tasks such as running the development server, migrating databases, and managing your application.
Here’s what it looks like:
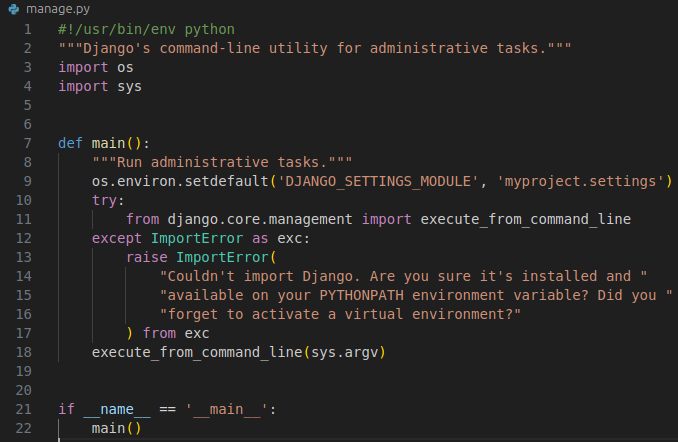
These are its key functions:

Sets the environment variable to tell Django which settings file to use.

Runs various Django commands such as runserver, migrate, and others.
__init__.py
This file converts your project directory as a Python package, allowing Python to import your project code as a module. It’s empty by default.
settings.py
This is one of the most crucial files in Django. It contains all the settings for your project, including database configurations, installed apps, middleware, and static file settings.
urls.py
This file defines the URL routes for your application. It maps URLs to views that process requests and return responses.
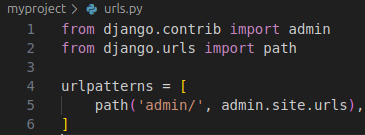
As you add more functionality to your application, you’ll extend urlpatterns to include routes for your own views.
asgi.py
This file provides an entry point for ASGI-compatible web servers to serve your project. ASGI (Asynchronous Server Gateway Interface) is the standard for asynchronous Django applications.

wsgi.py
This file is the entry point for WSGI-compatible web servers such as Gunicorn or uWSGI to serve your project in a production environment.

Understanding the role of each file and directory will equip you to modify settings, add URLs, and manage your project’s structure.
Conclusion
To begin working with Django you’ll first need to learn how to create a project. The process is really not that complicated and can be done in a few steps.
Before doing so, however, make sure you have a server with sufficient hardware according to your project’s need. Also, your system should have Django installed and environment variable set.
To summarize, go to your projects directory and use the startproject command to create a new project. Navigate to your project’s inner folder and add your server’s IP to ALLOWED_HOSTS. If all is done correctly, your new blank project should be up and running.
How to create Django project FAQ
How do I configure settings in a Django project?
To configure your Django project settings, open the settings.py file inside your project directory. Here, you can change various configurations by adjusting the value of each parameter. For example, you can toggle the debug mode or list known hosts.
How do I run the Django development server?
To run the Django development server, open your system’s terminal and navigate to your project folder, which contains the manage.py file. Activate your virtual environment if you use one. Then, enter python manage.py runserver to start the development server using via port 8000.


