Creating a simple style guide for your WordPress website

Has your website’s appearance ever spiraled out of control? This can happen with a brand-new website or an existing one that you must update regularly.
This problem is more likely to arise when your website is built and managed by a team because each member can add and edit the website’s content.
If you are familiar with Cascading Style Sheets (CSS) and how style rules are attached to the structure of a web page, this will be easier for you. However, if you don’t know CSS, don’t worry. A style guide can still help you maintain a consistent style for your site.
What is a style guide?
A style guide is usually a single source of truth document that details a website’s styling requirements.
The format used and its complexity will depend on circumstances. Usually, a simple website managed by one or two people won’t require a rigorous style guide. Meanwhile, a website managed by a large team would often involve enterprise-wide styling needs that adhere to corporate branding.
We will focus on a style guide that details the essential elements of any website. It is foundational, with the hope you will use and expand upon it as you see fit.
While there are hundreds of components to art direction for a website, let’s focus on how color, typography, and spacing may be defined in a style guide. Since we are making a simple style guide and there are about 50 style properties, we won’t include the following:
| Position | Overflow | |
| Grid | z-index | |
| Flex | Transform | |
| Float | Transition | |
| Opacity | Width | |
| Visibility | Height |
We will also omit any considerations pertaining to imagery. And while image formats, dimensions, file sizes, and usage can be included, we’ve intentionally chosen to exclude them from our style guide.
That said, don’t let our omissions stop you from using the above properties as you further develop your style guide.
Why should you use a style guide?
Not having a style guide almost guarantees that your website’s design will go off the rails over time. At best, you will have inconsistencies and an unresponsive site at worst.
A style guide is also a very efficient tool for collaborators. Suppose a team member joins an ongoing project. Rather than spending a long time communicating with other team members, the style guide provides a single source of information for new and existing collaborators.
It is most effective before a project starts, but it can still be useful even after a site is launched. A style guide can serve as a tool to get a site’s design back on track long after it has been online.
A refresher on CSS and how it is used
Understanding and building a style guide calls for some knowledge of how style is applied to any website using CSS.
CSS is a contextual design system. The style properties you assign apply to the structure of a HyperText Markup Language (HTML) web page. Assuming that the HTML – which includes tags such as <body>, <p>, and headings – is well-formed, your styles should display as intended.
Think of it like constructing a house. The framework of the house – the basement, rooms, and roof – would be the HTML. The styles – wallpaper, carpeting, and woodwork – would be the CSS. How well the structure is built will determine how well the styles will be applied and maintained. Fortunately, most theme authors adhere to the proper way of using HTML.
Now, how does the cascade work in CSS, and what about inheritance? These are two very important principles to understand when creating a style guide.
What is the cascade?
The cascade is a built-in browser mechanism that determines which style rules will be applied and which will be ignored. The browser’s and user’s styles will take precedence unless the designer provides a style rule.
In web design, three stylesheets interact with each other, and where a style is coded will determine its precedence:
- The Browser
- The User
- The Designer
Suppose a designer doesn’t set a website’s styles. Would you see nothing? No, you would see whatever the browser’s default styles are and what the user sets in the settings.
While many users don’t realize it, they can set some style properties, such as color and typeface. This is the User stylesheet.
A designer can override the default browser and user style settings with their styling preferences. This is very important to understand because if a designer is silent on any matter pertaining to style, the browser or user style preference will be used.
It makes life much easier, as a designer does not need to address every matter of style when creating a website. Rather, the designer can leverage what is already in place to do much of the heavy lifting in web design.
What is inheritance?
Think of a family and the genetic characteristics that are transferred from one generation to the next. Much like a family, web design involves inheriting style characteristics.
Here’s a very simple but effective example. The <body> element is parent to all elements that are within the body container. All elements that follow on your web page – paragraphs, headings, and the like – are the. When a style is set for the body element, in most cases, that style will descend to child elements.
If we set the body background color to white, the text color to black, and the font family to Tahoma, then all child elements – such as paragraphs and headings – will inherit those style properties.
This simplifies the process of setting styles for every element of a web page. You don’t need to define the style of every element because styles will descend from the body to the elements within it, just like a family.
However, where styles are set for a child element, those styles will override the style assigned to the parent element.

The essential simple style guide
Once you understand how CSS works, you can create a simple style guide.
Color, typography, and spacing are good places to start, especially if you are a beginner. Note that these styles are global, so they apply to the entire site.
Here is inheritance in action. We don’t need to assign a background color to the heading elements, as they will inherit that from the body’s background color. The paragraphs will inherit their styling from the body element, too.
| HTML | body | h1 | h2 | h3 | button | button:hover |
CSS | ||||||
| color | ##ffffff | #c5edc0 | #c5edc0 | #c5edc0 | #ffffff | #dddddd |
| background-color | #000000 | #5181BB | #c5edc0 | |||
| font-family | Open Sans | |||||
| font-size | 18px | |||||
| font-weight | 200 | 200 | 200 | |||
| font-style | 2.4 em | 1.92 em | 1.54 em | |||
| line-height | ||||||
| word-spacing | ||||||
| letter-spacing | ||||||
| text-align | Align-center | |||||
| padding-top | ||||||
| padding-right | ||||||
| padding-bottom | ||||||
| padding-left | ||||||
| padding | ||||||
| border | ||||||
| margin-top | ||||||
| margin-right | ||||||
| margin-bottom | ||||||
| margin-left | ||||||
| margin |
Start your own spreadsheet or a table.
The first row should contain the HTML elements, IDs, and classes. As you can see, ours only has HTML elements.
Then, reserve the first column for all your style properties. Fill in the cells as you see fit with your style values. As you go about developing your site, don’t forget to update your style guide. This adds an extra step to your workflow, but it’s worth it to maintain consistency in the long run.
You can copy and paste our example into your own spreadsheet and remove the style values so you can have a fresh start.
Adding your styles to your site using a style guide
While it’s great to have a reference document, that alone will not be enough. You’ll need to implement the content of the style guide to your site. Let’s look at a few ways to do this.
Adding styles to WordPress without a page builder
How styles are applied to your site will vary depending on whether you are using a block theme – a theme where each part of every page is made with blocks, or the older classic theme – where the main component of the site, including headers, footers, navigation, and sidebars, is hard-coded.
Block themes
Start by accessing the Site Editor and then select Styles.

First, access the Style Book by selecting the eye icon. The Style Book is a visual representation of the styles that are used across your website.

The Style Book has five tabs, one each for styling text, media, design, widgets, and theme.
Begin to transfer the styles in your style guide by changing the settings for each tab. Here, we changed the background and text colors for the entire site to match the style guide.
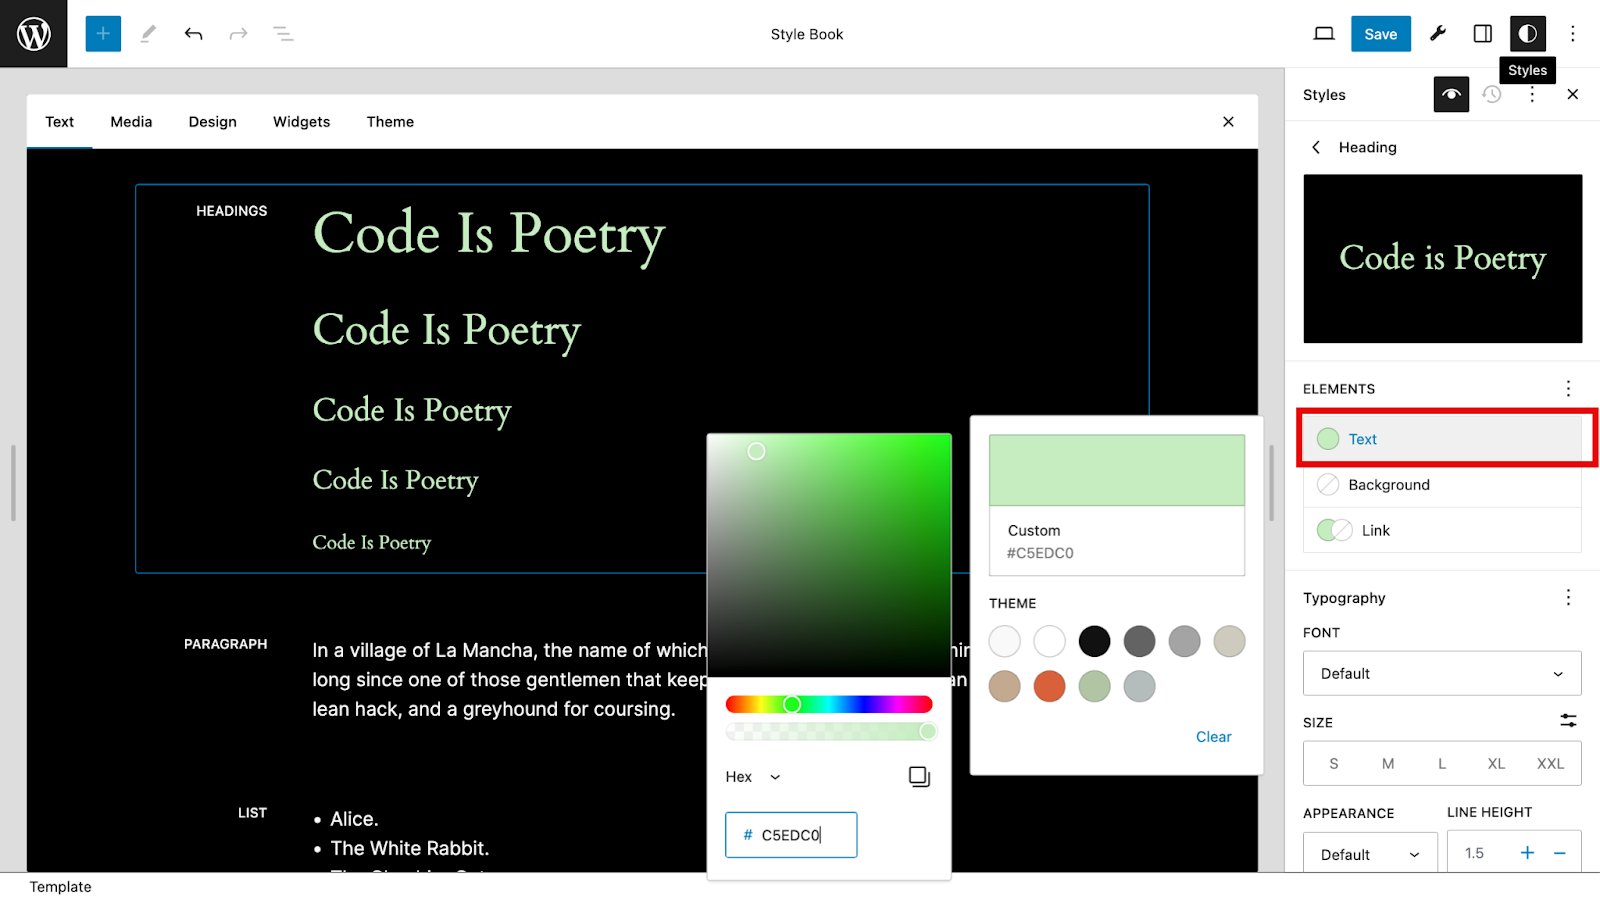
While it is ideal to do this at the start of a project, you can do it as you move along with your site’s design. You can make per-block styling changes at any time that will override the global styles. Again, the styles you are setting will apply to the entire site.
But what if a style in your style guide is not available in the Style Book? The style options will depend on your theme. WordPress and most themes now provide a wide array of style options. For example, even if your typeface preference does not come with your theme, it is now possible to add your font to the Font Library in the Style Book.
If necessary, you can add custom CSS to the child theme’s JSON file or as a code snippet using a plugin.
Classic themes
For a classic theme, you must rely on the feature in the custom settings page in the Appearance section.
The options available will depend upon your theme. Here, we are using the GeneratePress theme, which has these top-level settings.

Now, we begin transferring the color settings for the body.

If a style setting is not present, you can extend your theme’s styling options.
Adding styles using page builders
When choosing a page builder, consider a complete design system that allows you to implement your styles accurately and efficiently.
The methods to implement styles into websites using page builders vary as much as the page builders themselves. Let’s look at how to do it using one of the most popular page builders, Elementor.
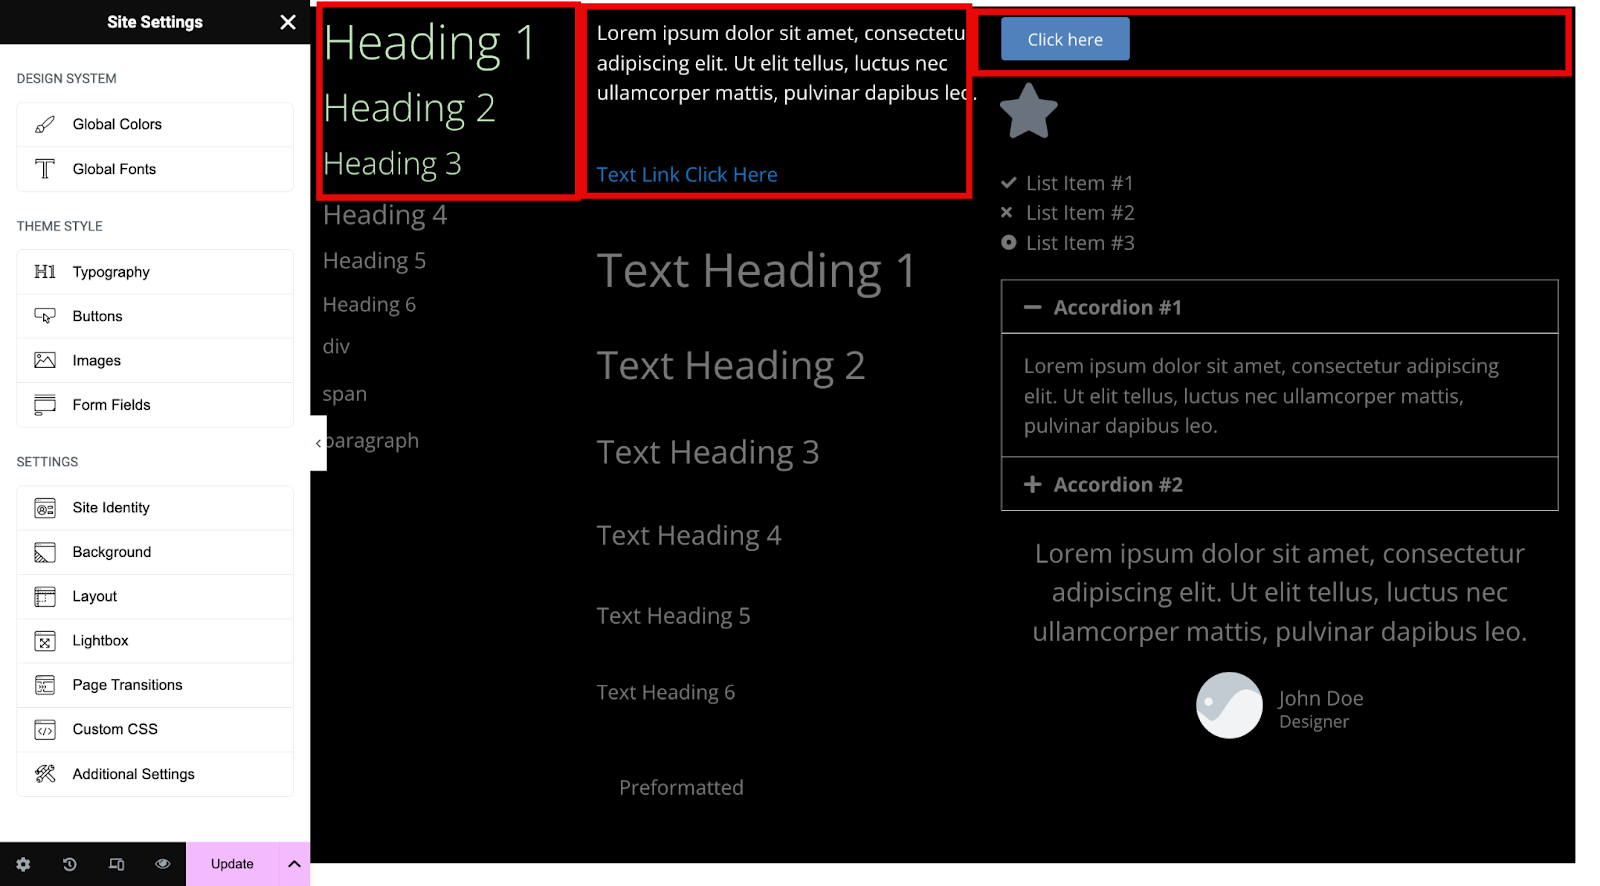
Wherever you are in the Elementor interface, you will have access to Style Settings. You will spend most of your time making adjustments to Global Colors and Fonts, Typography, Buttons, Images, Background, and Layout to conform to your style guide.

Let’s begin by setting the background color for all pages, as well as some of the typeface settings.

We suggest creating a typeface page where you can see all of your styles in one glance. This is the benefit of a design system and is akin to the Style Book in WordPress. Here, we have set our styles for our headings, paragraphs, and buttons.
Conclusion
A style guide, no matter how simple or complex, is a best practice approach to ensure that your site’s appearance remains consistent throughout the life of your project. It’s an essential document, especially when you’re managing a website with a team of collaborators.
Considering the principles of cascade and inheritance in CSS, you will find that creating and maintaining a style guide is not just a necessity but also a rewarding creative process.

Bud Kraus has been working with WordPress as an in-class and online instructor, site developer, and content creator for over 14 years. He’s a completely reformed web designer who no longer building WP sites and has shifted his focus on creating WordPress content for WordPress Businesses. To him, it’s just another way to teach and have fun working with clients he loves and admires. No matter the project, Bud works with clients the way they want to work and not the other way around. Working as a content creator Bud creates WordPress materials as educational articles or instructional videos for WordPress companies. Follow him on LinkedIn