GitLab best practices to improve your workflow
GitLab improves your development workflow through version control and a centralized repository. For beginners, using this platform optimally might be tricky due to various features and configurations.
In this tutorial, we will explain several GitLab best practices to help you use the tool more effectively. You will learn various tips, from managing your projects to maximizing your continuous integration and continuous delivery (CI/CD) pipeline for a smooth automation process.
Best practices for efficient project management
This section will cover the best practices for managing files and issues in your GitLab project repository.
New to GitLab?
If you are new to GitLab, some terms in this article might be unfamiliar. Before proceeding, we recommend checking out our GitLab tutorial to learn the basics about this platform.
Structure repositories for scalability
As your project grows, a single repository might have hundreds of files and folders. This makes navigating the items difficult, especially for other developers unfamiliar with the repo.
Structure your files, folders, and subfolders properly to make your repository easier to navigate. For example, only put similar items in the same directory and use a descriptive name.
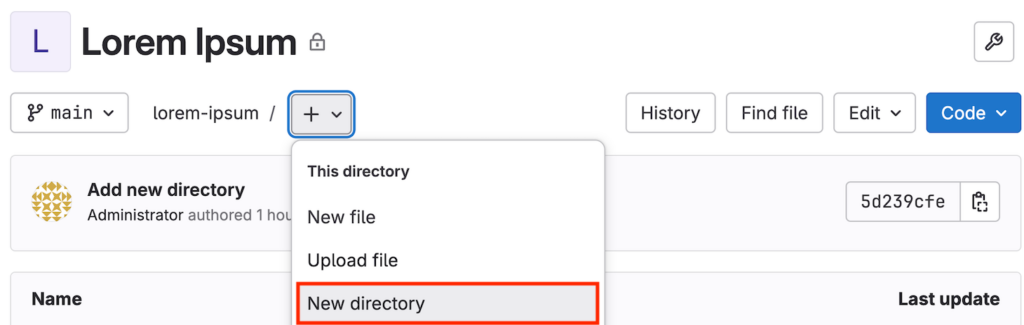
To create a folder, open your project, click the plus icon on the top left, and select New directory.
Also, add a description to each item so team members will understand where to find a specific file or folder. Moreover, explain your project structure in the repository’s README file.
Use GitLab groups and subgroups
GitLab lets you organize multiple related projects into groups or subgroups. In addition to simplifying collaboration, this feature enables you to set up webhooks or runners in bulk for easier pipeline management.
Moreover, you can limit groups to users with access privileges, ensuring only eligible members can access specific repositories.
To create one, expand the GitLab sidebar and click the plus icon → New Group. Then, enter your group information, invite other collaborators, and click Create Group.
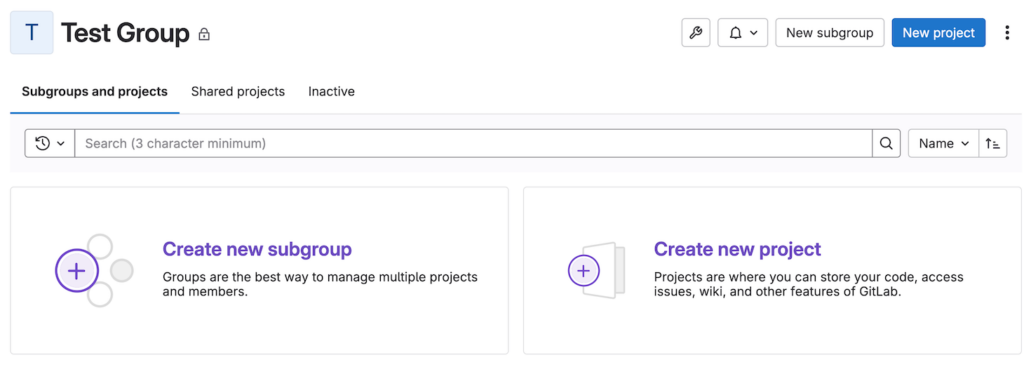
You can access the new group by selecting the Group menu from the main dashboard’s sidebar. On this page, you can add a new project or divide the current group into smaller subgroups.
Automate issue tracking with templates
Issues are integral for GitLab-based development since you use them to define the tasks the team members should complete. However, tracking issues might get complicated in a larger company since people present information about the task differently.
This problem can hinder productivity since unclear instructions require back-and-forth communication. To make the process more efficient, create a template specifying what the issue needs to cover.
Follow these steps to make a new issue template:
- From your project’s sidebar → Code → Repository.
- Click the plus icon next to your branch name.
- Select New File.
- Enter .gitlab/issue_templates/mytemplate.md as your filename. Replace mytemplate with your desired name.
- Write your desired issue template format in markdown.
- Finish by clicking Commit changes.
Once created, select it whenever you raise a new issue to automatically import the markdown content.
Tips for optimizing CI/CD pipelines
Here are several practices to optimize pipeline stages to ensure smooth project deployment and automation.
Leverage caching and artifacts
When a job runs in your pipeline, it will create and download a copy of the processed files as caches. Meanwhile, jobs generate an artifact as an archive of the previously handled files or directories.
Using both can help improve your CI/CD pipeline time and resource efficiency since subsequent jobs can use either cache or artifacts instead of fetching files directly from the repository.
Although similar, cache and artifact in GitLab have different functions. For example, different pipelines can use the same cache, but not a project.
To enable them, you can specify a cache and artifact inside your pipeline’s .giltab-ci.yml file. We recommend checking the GitLab caching documentation to learn more about their implementation.
Use pipeline schedules for automation
You can schedule a GitLab pipeline to run at a specific interval. It is useful for automating repetitive tasks like updating and unit testing in your application to save time and effort.
To set up one, you need a YAML pipeline file and developer privilege over the current project. Then, follow these steps:
- Open your project sidebar → Build → Pipeline schedules.
- Click Create a new pipeline schedule.
- Enter your pipeline information, including the execution interval. Alternatively, you can schedule it using cron syntax.
- Check the Activated box.
- Finish by clicking Create pipeline schedule.

Parallel jobs and pipelines
By default, GitLab runs jobs and pipelines sequentially. However, it might be inefficient if you have many deployment tasks since you will have a big backlog.
To make the process more efficient, you can run GitLab jobs in parallel by adding the parallel parameter in your YAML configuration file. Note that different languages and test suites have different parallelization setups.
For example, the following uses Semaphore Test Boosters and RSpec to divide a Ruby test into three parallel instances. The Gemfile looks as follows:
# Gemfile

source 'https://rubygems.org'

gem 'rspec'

gem 'semaphore_test_boosters'
Meanwhile, the YAML file has the following configuration:
test:

  parallel: 3

  script:

    - bundle

    - bundle exec rspec_booster --job $CI_NODE_INDEX/$CI_NODE_TOTAL
If you want to run parallel jobs with different variables, use the parallel:matrix keyword. For example, you can launch a pipeline to deploy your application on three different servers at the same time.
Pro tip
Inside the YAML file, you can also organize similar jobs as stages to improve your pipeline structure and flow.
Moreover, you can set up parallel pipelines by defining a sequence of jobs for different scenarios or branches. When you push changes to two branches, the pipeline will run simultaneously.
Maximizing GitLab runners
In this section, we will explain ways to maximize your GitLab runner for an optimal build and deployment flow.
Choosing the right runner for the job
GitLab lets you assign a runner for any task, regardless of whether it uses tags. However, this might slow down your CI workflow since resource contention might occur due to insufficient agents for the jobs.
That said, having too many runners can cause resource overhead and complicate the configuration process.
The best practice is to set up dedicated runners for different jobs. For example, one handles the build while another takes care of testing. It helps avoid resource contention and makes management easier.
Autoscaling runners
Autoscaling lets GitLab adjust the number of active runners based on the running jobs in your CI/CD pipeline. This feature ensures you have sufficient agents for your tasks while keeping resource usage minimal during non-busy times.
When many jobs run, GitLab will assign more agents. Conversely, it will shut down unassigned runners during idle operations.
Setting up autoscaling is complicated, as you need a dedicated GitLab host for the runners and Docker containers. Check out GitLab’s autoscaling runner documentation to learn more about the structure and steps to configure one.
Collaborating with merge requests
Optimizing your merge request and approval flow ensures seamless collaboration between team members. This section will explore the best practices for improving this task.
Enforce merge request approvals
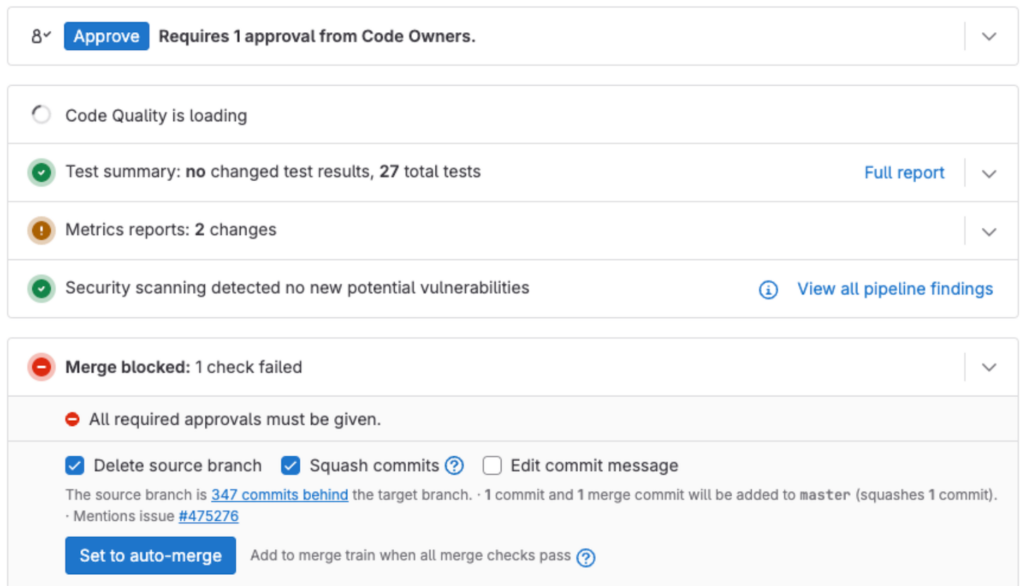
Reviewing and approving a new merge request is crucial to avoid issues. By default, however, GitLab lets you merge new code without approval, which can be problematic.
GitLab Premium and Ultimate let you enforce various rules to make the approval process mandatory. For example, a merge request should receive a certain number of approvals from specific reviewers before getting through.
To enforce these rules, head to your project’s sidebar → Settings → Merge requests. Go to the Merge request approvals section and add the approval rules based on your needs.
Use merge request templates
Merge conflicts happen when multiple developers modify the same code, and GitLab can’t determine the correct one. It commonly occurs due to a lack of description of what has changed.
Merge request templates can help reduce conflicts. The reviewer will have detailed information and descriptions of changes, enabling them to easily compare requests for code overlaps and inconsistencies.
You can make a merge request template by creating a new .gitlab/merge_request_templates/mytemplate.md file in your project. Add the guideline in the markdown language and click Commit changes.
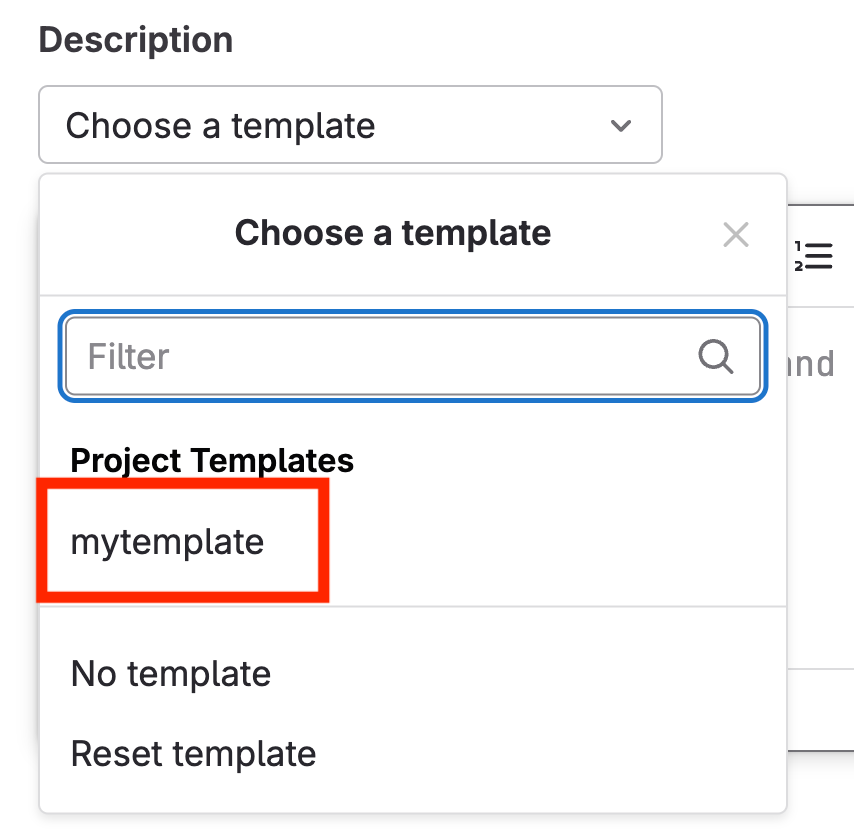
When you create a new merge request, expand the Choose a template drop-down menu under the Description section. If you select your new template, GitLab will automatically import content from your markdown file.
Assign merge request pipelines
Commonly, your CI/CD pipeline runs after you merge changes into existing code for automatic testing, build, and deployment. However, GitLab also lets you create a pipeline for merge requests.
This pipeline will run whenever you create or modify a merge request. It lets you automatically test and check the committed code, allowing the reviewer to check it more easily.
You can set one up using the same steps as other GitLab pipelines – creating the YAML file, adding the jobs, and writing the scripts. The difference is that you need the rules keyword to trigger it using a merge request. Here’s an example:
job1:

  script:

    - echo "This job runs in merge request pipelines"

  rules:

    - if: $CI_PIPELINE_SOURCE == 'merge_request_event'
Remember that you must also set up runners for the merge request pipeline.
Use branches effectively
Branches are integral to a Git-based software development life cycle, allowing developers to work on different tasks in an isolated environment.
Creating a separate line from the main branch keeps the main source code stable. Moreover, it lets your team work in parallel for continuous improvement and delivery. For example, you can create a feature branch to add new functionality while others work on bug fixes.
To create a new branch, open your project and click the plus icon → New branch. Enter a name and select the branch from which the new one will stem. Click Create branch to confirm.
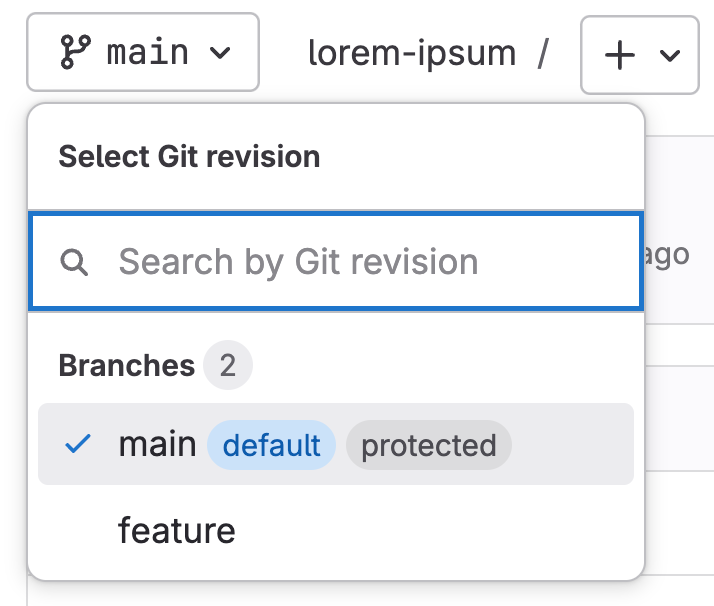
In a GitLab repository, you can switch to different branches by expanding the drop-down menu on the top left corner.
Advanced security practices
Here are several GitLab security policies to ensure an error-free and safe workflow across the entire development process.
Enable two-factor authentication (2FA)
In a team environment, multiple users can access your GitLab dashboard. If one of their passwords is compromised, it might lead to serious security breaches, such as data leaks or unauthorized access.
To improve security, enforce 2FA for all accounts in your GitLab. Here’s the easiest way to do so:
- Go to the GitLab main dashboard’s sidebar → Admin
- Navigate to the sidebar again → Settings → General.
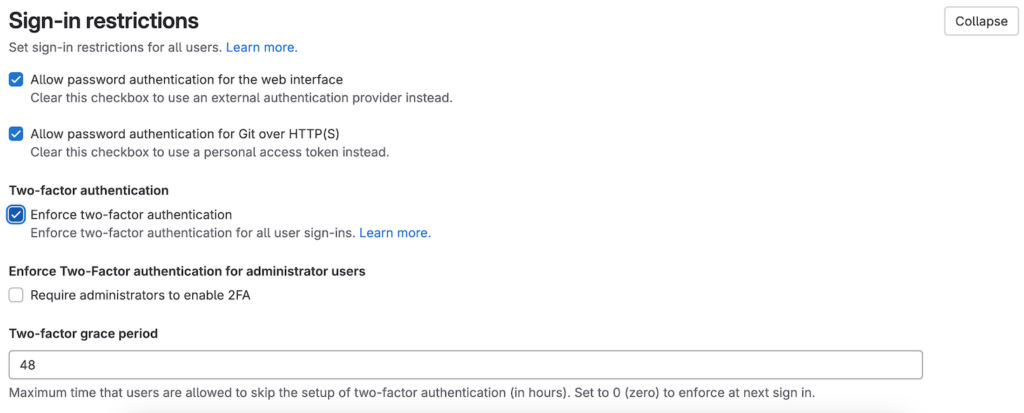
- Expand the Sign-in restrictions section.
- Click the Enforce two-factor authentication and Enforce Two-Factor authentication for administrator users box.
- Adjust the grace period to your needs. If you want users to use 2FA immediately, set it to 0.
- Click Save changes.
Important! By default, all users can make a new account on your self-hosted GitLab login screen. To improve security, enforce admin approval from the Sign-up restrictions menu to prevent cyber criminals from creating a malicious account.
Set up dependency scanning
GitLab ships with a suite of security features, including a dependency scanner that automatically analyzes vulnerabilities in your application’s software components. It typically runs during the development phase of your project pipeline.
Once the scans are complete, GitLab will list all vulnerabilities and their severity on the merge request. The reviewer can then address them before committing the code changes.
There are different ways to enable GitLab dependency scanning. For example, you can do so using the Auto DevOps feature or by directly adding the configuration to your project pipeline’s YAML file.
Use access tokens and permissions wisely
Access tokens enable different GitLab services, including API, registry, and repositories, to authenticate users, projects, or groups. If not managed properly, unauthorized parties might exploit them to access those services.
To improve security, never explicitly enter your token into any code, especially the one you will commit to the repository. Instead, enter the token in an environment variable and call it. Also, use a shorter expiration date and update the token regularly.
In addition to tokens, control user roles and permissions to ensure only authorized parties can access specific data. We recommend following the principle of least privilege, which means assigning as minimum access as possible for accounts to fulfill their functions.
GitLab has several default roles with predetermined permissions. However, you can also create a custom one to fine-tune access privileges in your GitLab project.
Managing code quality and documentation
Clean code and clear documentation reduce back and forth between team members, resulting in a more efficient workflow. Here are the several best practices to manage them.
Integrate code quality reports
The GitLab Code Quality feature analyzes your code’s readability and complexity, ensuring it is easily maintainable. It runs within your CI/CD pipeline to help you avoid merging changes that can ruin your main code quality.
You can enable this feature by turning on Auto DevOps or calling the Code Quality template into your pipeline’s .gitlab-ci.yml file. Here’s what the code looks like:
include:

   - template: Jobs/Code-Quality.gitlab-ci.yml
GitLab will write the code quality report in different areas, including the merge request widget, pipeline details view, and project quality view.
Automate documentation generation
The GitLab Pages feature lets you host a static website directly from your repository. In production, it is useful for publishing documentation or release notes since you can automatically log new changes.
Here’s a general example of how the flow might look in real-world usage: You create two projects for your application and the documentation website.
Within the application pipeline, add a script that writes changelogs to the documentation repository whenever you commit a new change. Meanwhile, the documentation pipeline specifies how it will take the changelogs and automatically deploy them to your site.
Note that the pipeline varies greatly depending on how you want to generate the documentation. To simplify the process, Hostinger GitLab hosting users can ask Kodee AI assistant for help.

Monitor and improve with GitLab analytics
Follow these analytic best practices to ensure your pipeline and service run optimally.
Integrate alerting for incident response
Since your GitLab CI/CD pipeline runs automatically, it might lack supervision. It can be problematic if issues like failed runners occur since your deployment will stop and go unnoticed.
To ensure your CI/CD runs smoothly, set up an alert to notify you about incidents in your pipeline. It enables you to respond to errors quickly, ensuring the problem doesn’t affect another workflow.
Set up alerts by going to your project sidebar → Settings → Monitor. Expand the Alert section and choose whether you want to get notifications from Prometheus or other applications. Click Save integration.
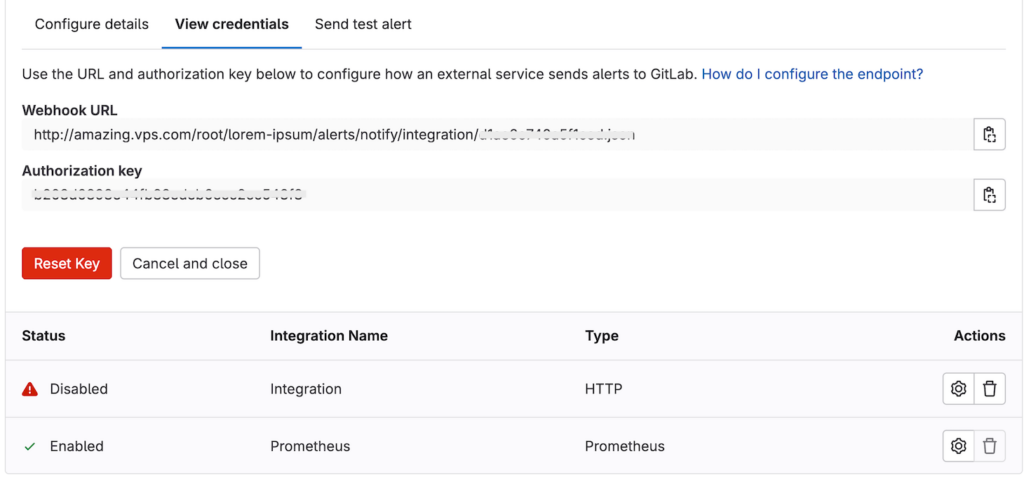
Click the gear icon on your new integration and go to the View credentials tab. Obtain the HTTP webhooks and authorization key. Add these details to your monitoring application to connect it.
Pro tip
You can also automatically create an incident for each alert and manage it effectively by integrating PagerDuty using webhooks.
Track team performance with Productivity Analytics
GitLab Premium and Ultimate have the Productivity Analytics feature, which lets you track statistics of your development flow, including the time it takes to complete a merge request and milestones with the most changes.
Productivity Analytics is suitable for identifying bottlenecks and areas for improvement in a smaller scope, like a team environment.
To access this feature, open your group’s sidebar → Analyze → Productivity analytics. On this menu, you can filter the report based on different categories, including projects, authors, milestones, or timestamps, for easier analysis.
Conclusion
GitLab is a powerful Git platform that improves your productivity through features like automation and a centralized project management tool. In this article, we have explained several best practices for optimizing your GitLab efficiency. Here’s the recap:
- Manage your project – organize your repository files, group related projects, and create issue templates for easier tracking.
- Optimize CI/CD pipeline – use cache and artifacts, schedule pipeline for repetitive tasks, and run jobs in parallel to offload the tasks.
- Maximize runners – assign a dedicated runner for each job and configure an autoscaling setup to optimize resource consumption.
- Enhance merge requests – enforce merge approval rules, create a merge request template, and set up pipelines to process requests automatically.
- Apply security best practices – enable 2FA, configure GitLab’s built-in dependency scanning, and limit access tokens and user permissions.
- Maintain code quality and documentation – integrate the Code Quality feature to simplify the code review process and use GitLab Pages to automatically deploy update documentation.
- Monitor and analyze GitLab metrics – check important metrics using the Productivity Analytics and set up alerting for incident response.
We hope this article has helped you collaborate and work more effectively. If you encounter difficulties, ask our Kodee AI assistant for instant help or leave us a comment below.
GitLab best practices FAQ
What are the key best practices for using GitLab?
There are various GitLab tips. For example, create a proper project structure using folders and groups. Optimize your CI/CD pipeline by using cache and maximizing runners. Also, enable GitLab’s built-in features, such as vulnerability scanning, code quality analysis, and analytics.
How can I optimize merge requests in GitLab?
To optimize merge requests in GitLab, ensure team members provide consistent descriptions and information using a template. Enforce approval rules so that only reviewed changes are merged. Moreover, set up a request pipeline to automate processes like testing.
What CI/CD practices work well with GitLab?
One of the most important CI/CD practices in GitLab is leveraging caches and artifacts to enable your jobs to process files more quickly. Also, schedule pipelines for frequent tasks like updating and running multiple jobs in parallel. GitLab’s built-in features let you easily set these up without third-party tools.

Aris is a Content Writer specializing in Linux and WordPress development. He has a passion for networking, front-end web development, and server administration. By combining his IT and writing experience, Aris creates content that helps people easily understand complex technical topics to start their online journey. Follow him on LinkedIn.

