WooCommerce REST API: A complete guide

Are you looking to connect your WooCommerce store with external platforms? The WooCommerce REST API is a good friend! It makes it easy to access and manage store data with HTTP requests.
In this guide, we’ll cover everything you need to know about the WooCommerce REST API, from setup and authentication to troubleshooting tips. Whether you’re a developer or a store owner, this guide will help you make the most of the WooCommerce API.
What is WooCommerce REST API?
The WooCommerce REST API is an interface that allows external applications, websites, and systems to interact with your online store. In other words, it lets you retrieve and manage store data without direct access to the WordPress dashboard.
Advantages of using WooCommerce API
You can benefit from the REST API in many ways, including:
Efficient store management
The WooCommerce REST API allows store owners to automate tasks, such as:
✅ Syncing inventory levels between WooCommerce and warehouses.
✅ Reducing stock count in real time when an order is placed.
✅ Auto-generating invoices and send them to customers when an order is placed.
✅ Automatically assigning orders to specific shipping providers based on location.
✅ Bulk-updating product prices and descriptions across multiple stores.
Seamless third-party integrations
Businesses rely on different software tools to manage operations. The WooCommerce REST API enables seamless integration with:
✅ Enterprise resource planning (ERP) tools to sync product inventory, supplier data, and warehouse stock levels in real time.
✅ Customer relationship management (CRM) systems to automatically process customer data.
✅ Accounting software to sync transactions, taxes, and refunds.
✅ Business intelligence tools like Google Data Studio, Power BI, or Tableau for custom sales reports.
Multichannel selling
The WooCommerce REST API helps sync multiple sales channels seamlessly. Here are some use case examples:
✅ List WooCommerce products on Amazon, eBay, Walmart, and Etsy while keeping stock synchronized.
✅ Auto-sync WooCommerce products with other selling channels like Instagram Shopping, Facebook Marketplace, or TikTok Shop.
✅ Route orders to different warehouses or fulfillment centers.
Custom mobile or web apps
The WooCommerce REST API is beneficial for businesses that want to build custom mobile apps, POS systems, or headless commerce solutions. You can:
✅ Create a native iOS or Android app that pulls product data, customer accounts, and orders from WooCommerce.
✅ Connect WooCommerce with in-store point of sale (POS) systems to sync sales and inventory.
✅ Use WooCommerce as the backend while building a fully customized front-end with other frameworks like React, Vue, or Next.js.
Scalability and flexibility
As your business grows, modifying WooCommerce’s core files can impact your store’s performance negatively. You can use the WooCommerce REST API as a scalable solution for:
✅ Implementing advanced pricing rules based on customer roles, cart value, or purchase history.
✅ Building custom subscription models without relying on third-party plugins.
✅ Integrating with AI-based recommendation engines to personalize product suggestions.
How does WooCommerce API work?
The WooCommerce API follows the Representational State Transfer (REST) principles, which provide guidelines for building scalable and stateless web services. This makes the WooCommerce API a RESTful application.
When exchanging data, the API sends a request to the WooCommerce database. In return, it provides a response containing the requested content along with confirmation of whether the process was successful.
External applications use REST API endpoints to determine which data to retrieve from your WooCommerce site. These endpoints are URLs that target specific store elements, such as products, orders, or customers. For instance, the following route accesses your store’s list of products:
http://example.com/wp-json/wc/v3/products
These routes interact with WooCommerce’s endpoint functions, allowing you to manage the data using standard HTTP methods:
- GET – fetches data from the server.
- POST – creates new data.
- PUT – updates existing data.
- DELETE – removes data.
WooCommerce API requirements
Before you start using the WooCommerce REST API, make sure that you meet the following requirements:
- Newer WordPress and WooCommerce version – the API is only compatible with WordPress 4.4+ with WooCommerce 3.5+ activated.
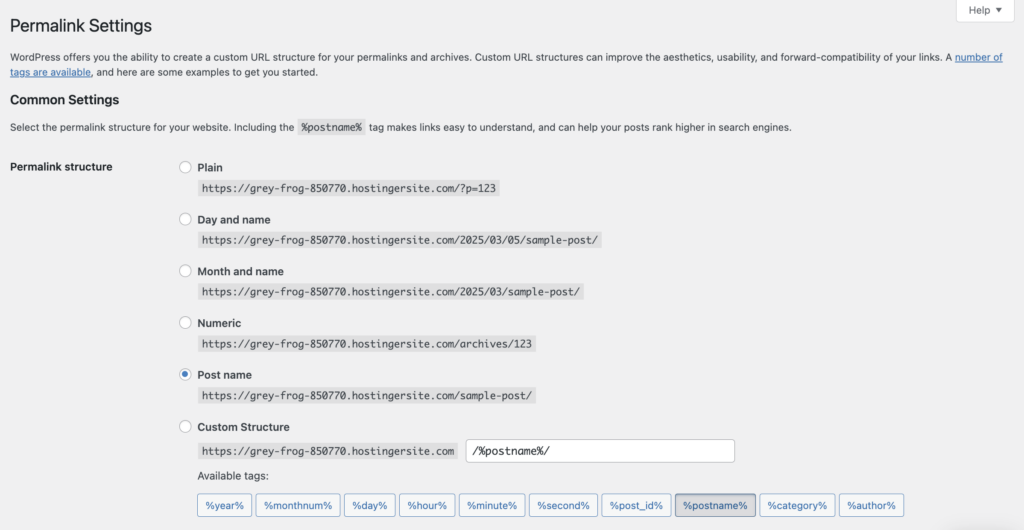
- Clean permalinks enabled – to do this, go to Settings → Permalinks from your WordPress dashboard. Any permalink setting other than Plain will work.
- Correct WordPress user roles and permissions – only users with Administrator and Shop Manager roles can generate API keys and access certain endpoints.
- HTTPS enabled – WooCommerce highly promotes HTTPS usage to secure API requests. Installing an SSL certificate also helps prevent errors related to establishing a secure connection.
How to generate WooCommerce REST API key
Once you confirm that all the requirements are met, create an authentication key to keep your API requests secure. WooCommerce supports different authentication methods, including API keys, OAuth 1.0a, and Basic Auth.
Let’s keep it simple! Here’s how you can generate the WooCommerce REST API keys from your WordPress dashboard:
- Log in to your WordPress dashboard.
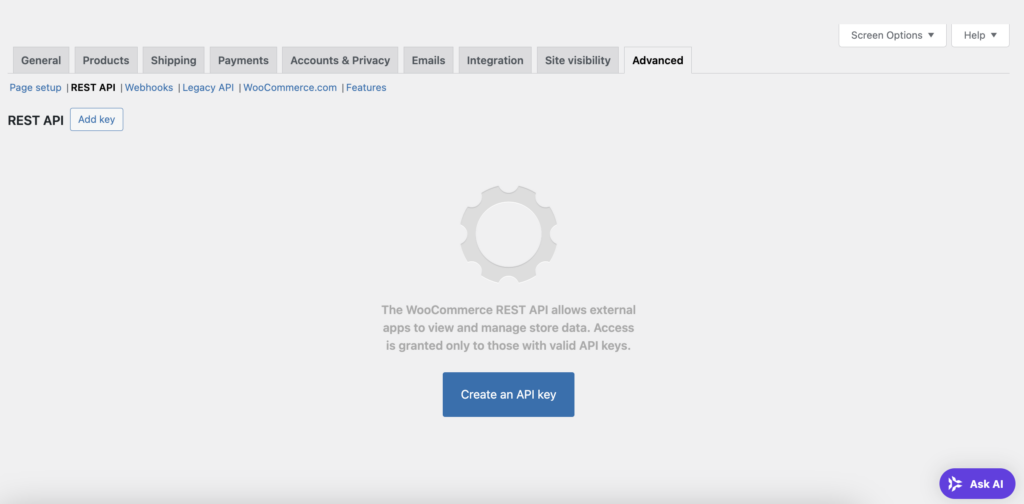
- Navigate to WooCommerce → Settings → Advanced.
- Open the REST API tab, and click Create an API key.
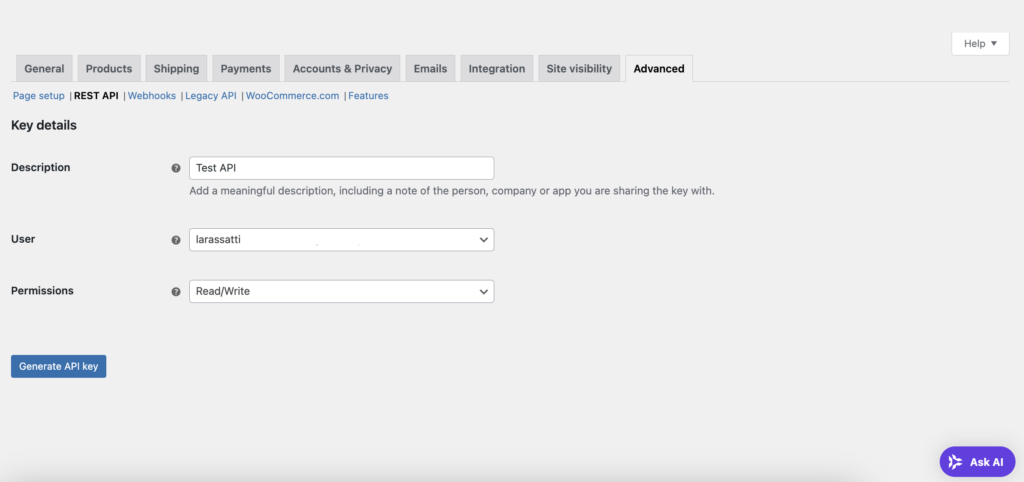
- Add a description, select the WordPress user who will own the key, and then choose the level of access from the drop-down menu.
- Click the Generate API Key button.
- You’ll see the Consumer Key and Consumer Secret information along with a barcode. Make sure to store them in a safe place, as you’ll only see them once.
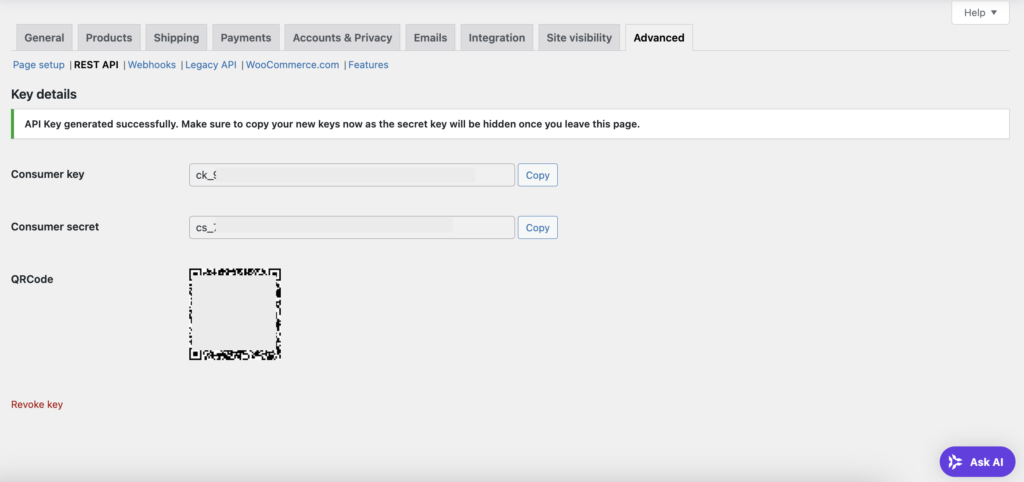
Important! If you delete the WordPress user linked to an API key, the key will stop working. API keys can’t be transferred to other users.
How to use WooCommerce REST API
If you’re planning to use the WooCommerce REST API in an external application, you’ll need to write a script in the application’s programming language to send requests.
Some API endpoints you can use include:
| Endpoints | Functions |
| /wp-json/wc/v3/products | Retrieve or create products |
| /wp-json/wc/v3/products/id number | Manage a specific product |
| /wp-json/wc/v3/orders | Retrieve or create orders |
| /wp-json/wc/v3/orders/id number | Manage a specific order |
| /wp-json/wc/v3/customers | Retrieve or create customer data |
| /wp-json/wc/v3/customers/id number | Manage specific customer data |
| /wp-json/wc/v3/categories | Retrieve or create categories |
| /wp-json/wc/v3/categories/id number | Manage a specific category |
| /wp-json/wc/v3/coupons | Retrieve or create coupons |
| /wp-json/wc/v3/coupons/id number | Manage a specific coupon |
For a complete list of API endpoints and attributes, refer to the official WooCommerce documentation.
It’s always a good idea to test whether your WooCommerce REST API works correctly, as it can help identify potential issues or bugs early on.
In this section, we’ll show you how to use Postman, a manual testing tool to send and verify API requests before implementing them in your application. We’ll focus on manipulating product data using the API.
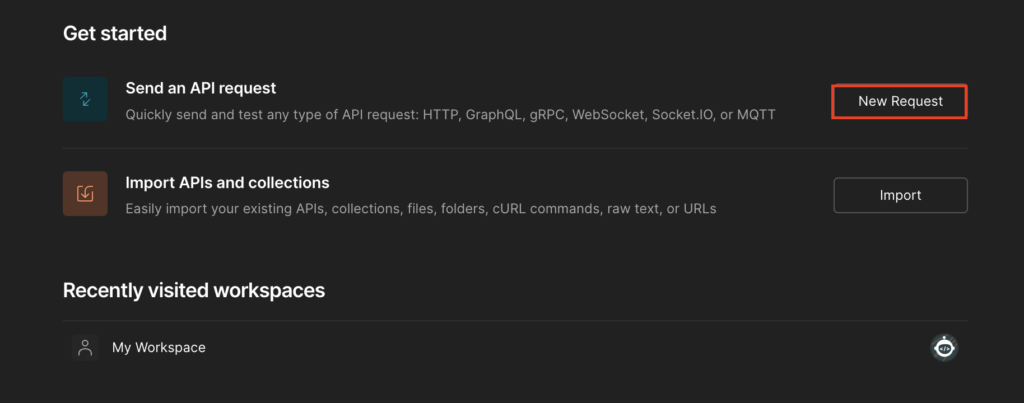
If this is your first time using Postman, you’ll need to create an account first. Once you can see the home page, click the New Request button.
Using WooCommerce API to retrieve all product data
Once you enter the workspace interface, follow these steps to fetch your entire product data:
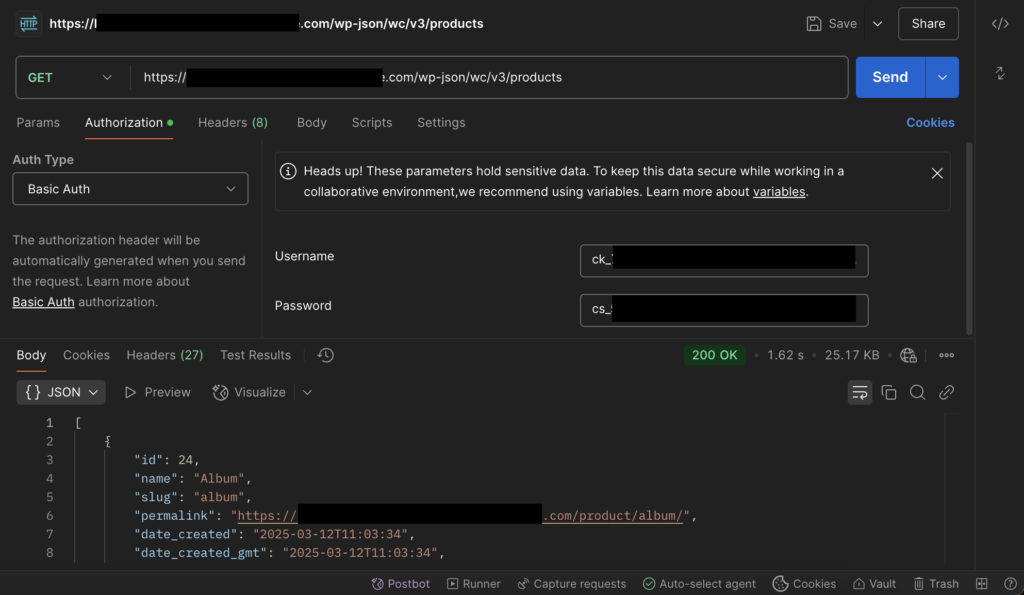
- Select GET from the drop-down menu.
- In the text field, type the endpoint URL, like https://example.com/wp-json/wc/v3/products (remember to replace the store’s URL with your own).
- Go to the Authorization tab. Choose Basic Auth from the drop-down menu.
- Input your Consumer Key in the Username field and your Consumer Secret in the Password field.
- Hit Send.
If you receive a 200 OK response, it means your API request was successful. Your full product list will be displayed in the results.
Using WooCommerce API to add products
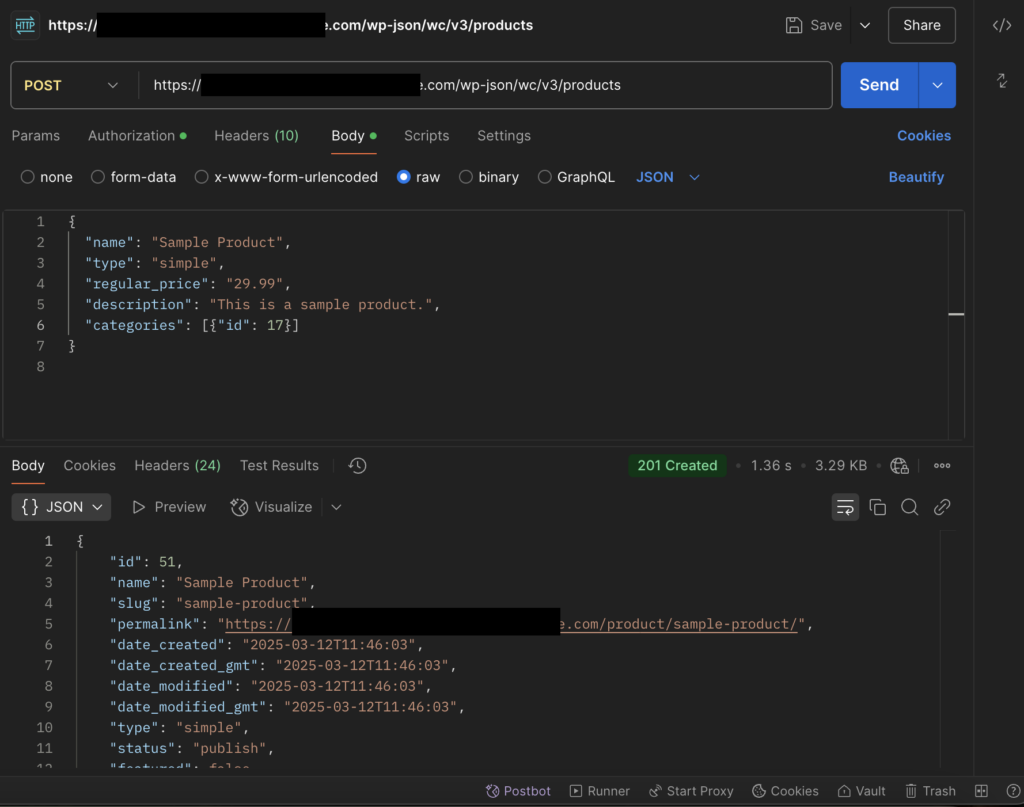
Other than fetching data, you can send a POST request to add a new product:
- Choose POST from the drop-down menu.
- Make sure the API endpoint URL is correct.
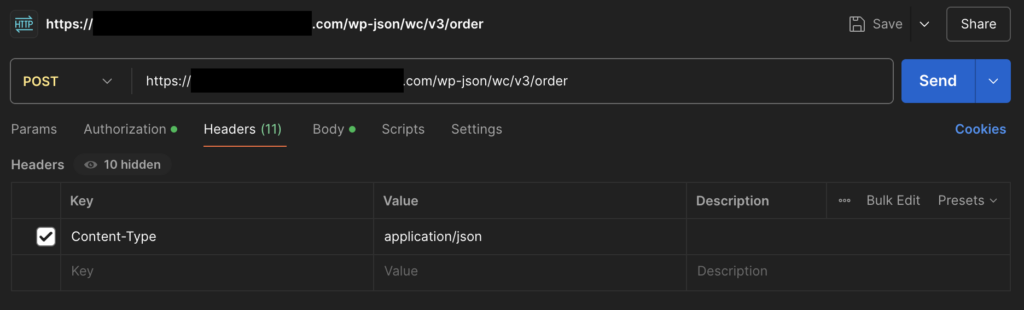
- Open the Headers tab. Type Content-Type in the Key field and application/json in Value.
- Go to the Body tab, select raw, and enter the following JSON script:
{

  "name": "Sample Product",

  "type": "simple",

  "regular_price": "29.99",

  "description": "This is a sample product.",

  "categories": [{"id": 17}]

}
- Feel free to tweak the product information as you see fit. Hit Send once done.
If successful, the response will return the product details with an ID.
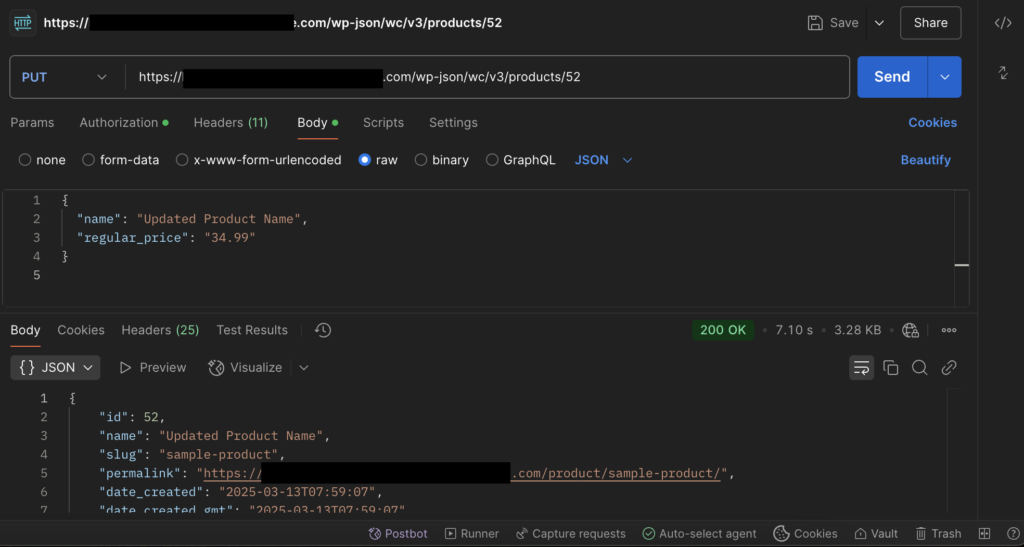
Using WooCommerce API to update product data
To edit existing product data without accessing your WooCommerce dashboard, follow this step:
- Change the request method to PUT.
- Enter the API URL with the product ID that you want to change, like: https://example.com/wp-json/wc/v3/products/17.
- In the Body tab, enter the JSON script with the updated product information:
{

  "name": "Updated Product Name",

  "regular_price": "34.99"

}
- Hit Send.
The 200 OK response should confirm the product update.
Common WooCommerce API issues
While working with the WooCommerce REST API can have its hurdles, most issues are easy to fix. In this section, we’ll highlight common challenges and the simple solutions to fix them.
Authentication errors
When your API requests fail with an authentication error, it means the credentials are incorrect, expired, or improperly formatted.
Solutions:
✅ Check if the API keys you’re using are correct.
✅ Make sure you’re using the appropriate authentication method for your request.
✅ Some hosting providers disable Basic Authentication for security reasons. If you’re using it, confirm that your host supports it.
Invalid or missing API keys
If WooCommerce rejects your API request due to invalid or missing API keys, it means the API credentials aren’t set up correctly or have insufficient permissions.
Solutions:
✅ If your API keys aren’t working, revoke them and generate new ones.
✅ Make sure the API key has the right permission to perform the operations.
✅ Include the API keys properly.
401 Unauthorized or 403 Forbidden errors
These errors happen when the user role doesn’t have permission to access the API endpoint, or an external security setting is blocking the request.
Solutions:
✅ Make sure your WordPress account is assigned to the Administrator or Shop Manager role.
✅ Some WordPress security plugins block API requests. Try temporarily deactivating the plugin to see if the API is working.
✅ If you use Cloudflare or a web application firewall (WAF), allowlist your API endpoints to prevent blocking.
404 Not Found error
This occurs when the requested endpoint doesn’t exist or your WordPress permalinks aren’t configured correctly.
Solutions:
✅ Make sure your WooCommerce site has the pretty permalink setting enabled.
✅ Recheck your API version and endpoint, and make sure they are correct.
✅ If you’re fetching a specific product or order, verify if the resource exists in WooCommerce.
400 Bad Request error
This occurs when the request is improperly formatted, contains missing parameters, or includes invalid data.
Solutions:
✅ Make sure that all required parameters are included in the request.
✅ Check if the data format matches WooCommerce API specifications.
✅ Verify that your authentication details (API keys, tokens) are correct and properly formatted.
API rate limits and performance issues
WooCommerce limits the number of API requests per hour, which can cause performance issues or temporary blocks.
Solutions:
✅ Use batch requests to fetch or update multiple records in a single call.
✅ Reduce redundant API calls by storing frequently requested data locally.
✅ If necessary, modify rate limits using a plugin like WooCommerce REST API Manager or adjust the Apache/Nginx rate limits.

Conclusion
The WooCommerce REST API lets your store seamlessly integrate with third-party applications, automate tasks, and manage data programmatically. Whether you want to fetch product details, update order statuses, or customize customer information, you can do it without accessing your WordPress dashboard.
Since the WooCommerce REST API is enabled by default, you can start testing it right away using tools like Postman or by running cURL commands. Use GET requests to retrieve data, POST to create new entries, PUT to update existing records, and DELETE to remove them. Just be sure to secure your API with proper authentication, such as OAuth or API keys, and optimize performance by handling requests efficiently.
Ready to elevate your WooCommerce store? Start experimenting with the API today and see what’s possible.
WooCommerce REST API FAQ
How to get data from WooCommerce API?
First, generate API keys from your WooCommerce settings to authenticate requests. Next, send a GET request to the specific API endpoint using a platform like Postman or by running a cURL command in your terminal.
How do I create a custom API in WooCommerce?
Navigate to WooCommerce → Settings → Advanced from your WordPress dashboard. Under the Page setup tab, find the Account endpoints section, where you can customize the URL endpoints. Make sure the URLs are unique to prevent conflicts, and don’t forget to click Save changes once you’re done.
What is the limit of REST API in WooCommerce?
By default, the WooCommerce REST API supports up to 100 items per request.

Larassatti Dharma is a Content Writer with 3+ years of experience in the web hosting industry. She’s also a WordPress contributor who loves to share helpful content with others. When she's not writing, Laras enjoys learning foreign languages and traveling. Follow her on LinkedIn