How to build an eLearning site in 5 steps + tips for growth
In the past few years, eLearning platforms have been on the rise. A study from McKinsey has found that online learning is experiencing record levels of growth – as much as 92% through 2020. Universities are starting to invest heavily in the industry, taking hints from already established eLearning platforms like Coursera.
This has resulted in an increase in the credibility of online courses as recruiters begin taking online certificates more seriously. Thus, it is a great way of giving back to the community by sharing your skills.
Starting an eLearning site is also a profitable way to make money online with low website setup costs. So, how do you create an interactive eLearning website? Let’s find out.

How to build an eLearning website
Let’s dive into the 5 steps of creating an eLearning website.
1. Create an online presence and buy a domain
Before you start working on your platform, you need a name. Moreover, the name also has to have a domain available for it. Here are a few hints on how to come up with a great-sounding domain for your platform:
- Start by brainstorming ideas for names, something that would reflect both your niche and your preferences
- Check the availability of a domain using a website domain checker
- Prefer the .com TLD above all other options
- Try to keep it short to make sure others can memorize it easily
- Avoid using symbols and numbers. Make the name sound more universal
- Purchase a domain name as soon as you can to prevent someone else from registering it. If a popular domain is already taken or too expensive, there are plenty of cheap but trusted domains you can choose from.
Domain Name Checker
Instantly check domain name availability.
Once you have an available domain, you’re going to need a hosting platform to host your site. Hostinger was built from the ground up to be user-friendly and features scalable plans to get you started on your online eLearning journey. We recommend our Premium shared hosting plan for small to medium-sized websites.
2. Set up your eLearning website
By using WordPress, we get the added advantage of a huge library of plugins available that can accomplish anything you need, from building your website to managing your video library. Furthermore, WordPress is user-friendly, requiring little to no tech knowledge.

Here are some of the best plugins for an eLearning site when using WordPress:
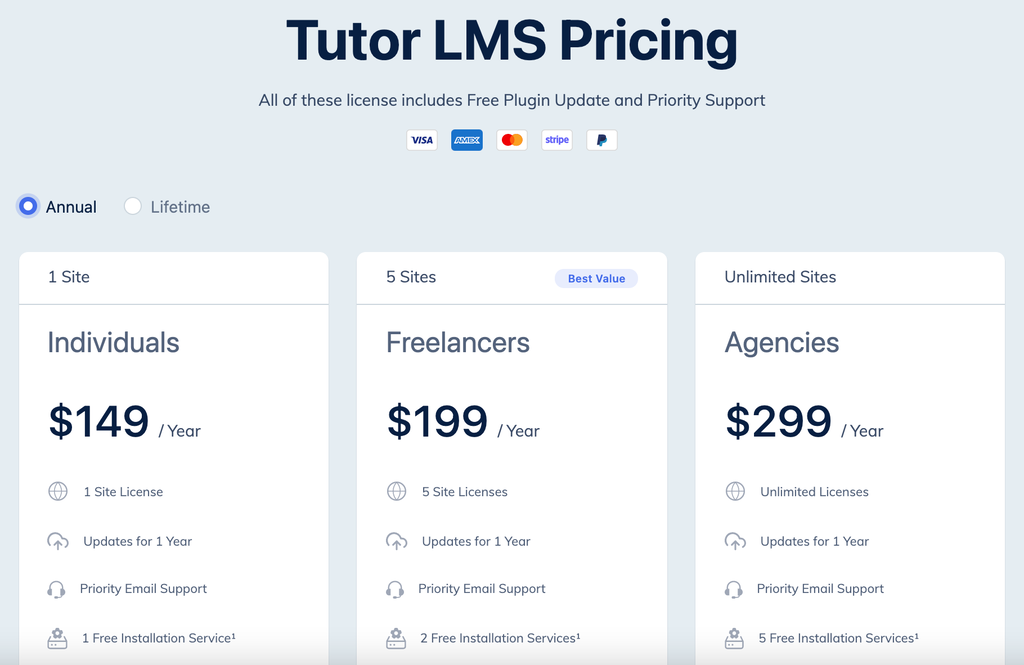
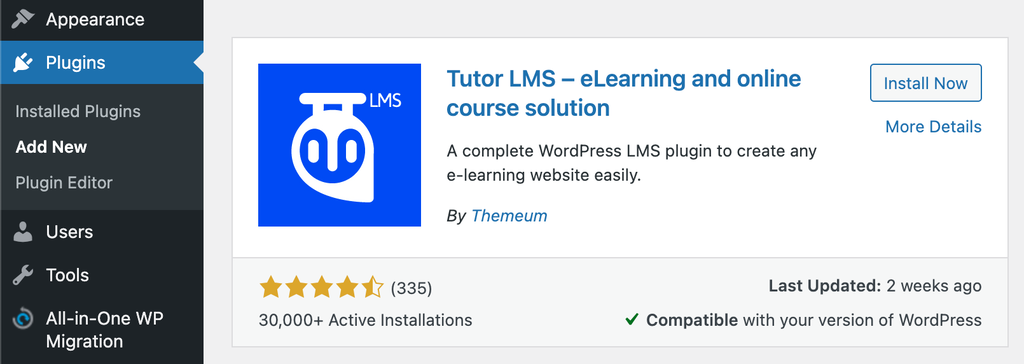
This plugin can essentially become the core of your website – it is a complete learning management system that handles everything related to eLearning. Although a newcomer, Tutor LMS has gained a lot of traction and attention recently due to its huge library of free and paid features.
While you could easily make an eLearning site with just the free version of the plugin, its premium features are a great investment to take your LMS to the next level.
Once you are done with the purchase, the plugin file will be waiting for you in your Themeum Dashboard.
As soon as you’re done with downloading the “.zip” file, head over to your WordPress admin panel, go to Plugins → Add New, then click on Upload Plugin and select the file you just downloaded.
Install and activate it. You will also need the free version of Tutor LMS for it to function fully. On the Search plugins field, type “Tutor LMS” to find Tutor Free, then install and activate it as well. We’ve now added the Tutor LMS premium version to the site.
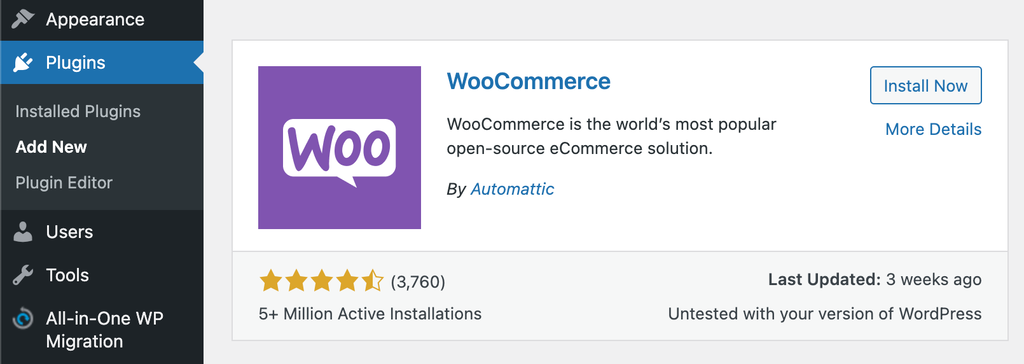
WordPress has a ton of monetization systems available to its users – the most popular of which is WooCommerce. It’s a super easy-to-use eCommerce plugin that makes the monetization process an absolute breeze. Moreover, it’s free as well, and that’s always a welcome sight.
Packing years of experience under their belts, WooCommerce allows you to manage how people can purchase your online courses. It’s an essential tool to have when you’re dealing with an eLearning website.
While making an online course, you need a place to securely store and distribute your premium video content. Having a secure platform is important when you want to have control over who actually has access to your content.
VooPlayer is a premium video hosting platform that specializes in securely distributing your video content to your subscribers. To use VooPlayer, simply go to their site and select a plan that seems right for you. After completing your purchase, you can upload your video content securely to your VooPlayer site. We will talk about how to add these items to your course in a bit.
YouTube
If you’re not planning on monetizing your course content, options like YouTube are really accessible. Simply create an account and upload your video content to YouTube, and you’re good to go. You can add these video pieces to your courses at a later date.
Themes
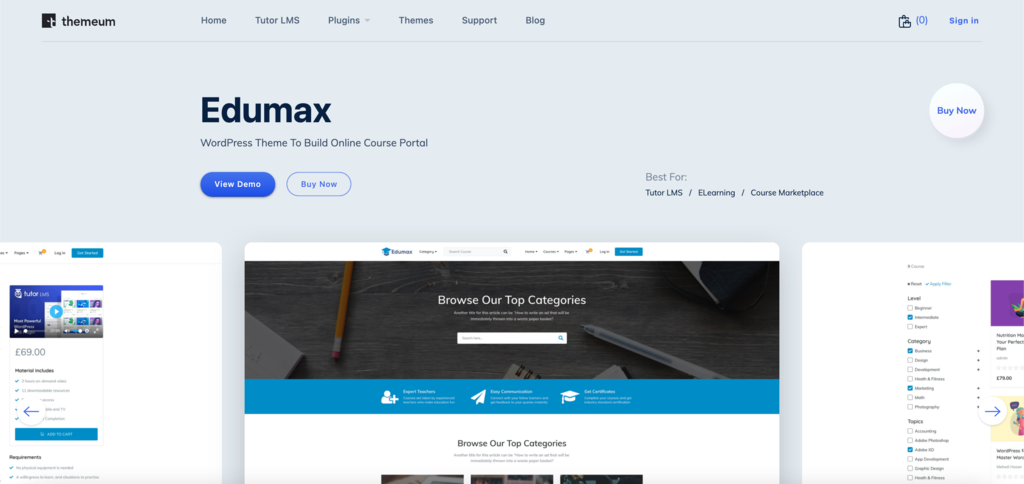
WordPress themes allow you to add a unique look to your LMS platform. There are tons of themes that are based around LMS platforms, some are paid, some are free. But perhaps no other theme can integrate with Tutor Pro as well as their own Edumax.
Edumax is a theme that supports all the unique features that Tutor LMS has, such as dashboard analytics, a front-end course builder, and so on. To get Edumax, you must first head to their page and complete the purchase the same way you did with Tutor Pro. Then, your theme file will be ready to download in your Themeum Dashboard.
You will be prompted to download a .zip file just like before. Once that is done, you can go to your WordPress admin panel and navigate to Themes → Add New → Upload Theme. Then upload the .zip file you just downloaded, and install and activate the theme.
Astra is one of the best WordPress themes and integrates with most leading learning management systems, including Tutor LMS. The theme is fast and fully responsive, scoring 100% on Pingdom.
The installation process is straightforward, too. Start by installing one of the ready-made templates and customizing it to your needs.
3. Create your online courses
Now that we’ve set up everything we need to create our online training module, let’s get to actually making content. Tutor LMS Pro provides two different ways of creating courses. Each has its own features and will appeal to different types of instructors.
Back-end course builder
The back-end course builder can be found in the WordPress back-end admin panel. In order to add new courses, simply navigate to Tutor LMS Pro → Courses → Add New, and you will be greeted with a course builder page. One of the best parts about Tutor LMS is that the entire course can be created from this single page, regardless of course size and content length.
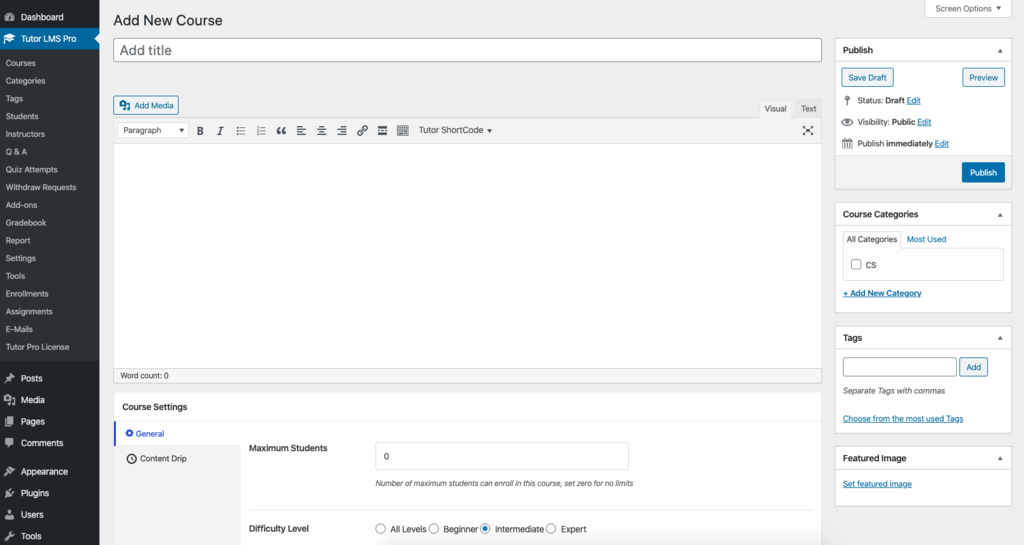
From here, you can start adding content for your course, like the Title, Description, Tags, and Featured Images. If you want to limit the number of students, you can use the Maximum Students field. You can also set the Difficulty Level of the course.
If your course contains private attachments such as worksheets and practice materials, you can attach them to the Attachments field. This will be available to your students to download while completing the course.
Afterward, you can create a prerequisite course system by selecting a course prerequisite. A prerequisite course must be completed before enrolling in this course. For example, Basics of Programming Languages must be completed before taking the Advanced Java Algorithms course.
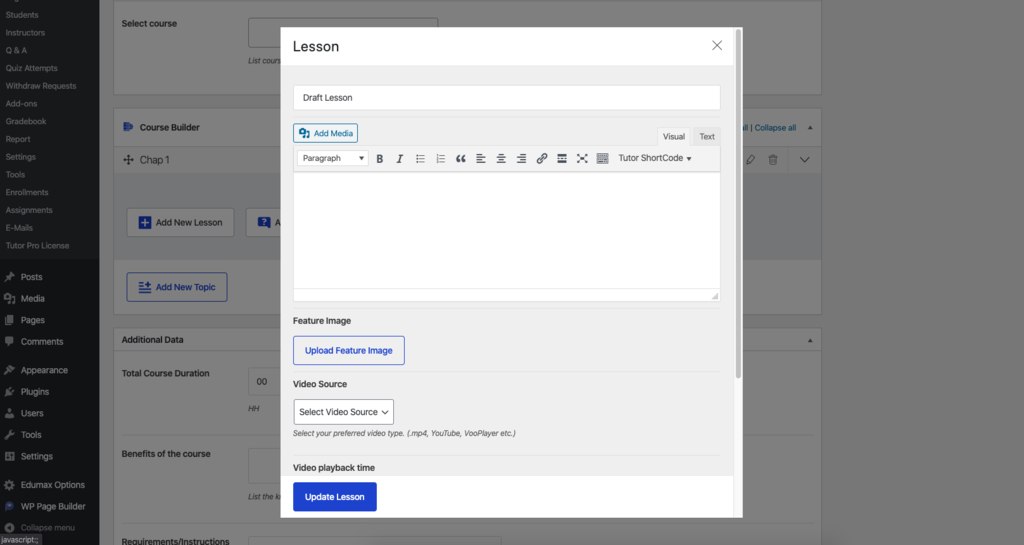
Then we go onto the main part of the course – the course builder itself. Here, you can add Topics and give them a name and summary. The course hierarchy may seem a bit confusing, but you’ll get the hang of it eventually. Each of the assigned topics can have Quizzes and Assignments, along with other lessons nested inside those topics themselves.
Lessons contain the bulk of the course content. While building a lesson, you can give it a name, a written excerpt of the materials to be covered, and a featured image followed by the video source. Here’s where the video hosting service comes in – if you are using VooPlayer, you have to first select the Embedded option as the video source.
Then, go to your VooPlayer account and copy the embedded code of the video for this lesson. Paste it into the Create Lessons form. This will embed the video from VooPlayer to your course. If you were using YouTube, select YouTube as the video source and paste the link to the video here.
You will also get the chance to add Quizzes to each topic. We will discuss the quiz builder in a separate segment below. You can also add a course Intro Video here, which is a free introductory video to grab the attention of perusing users.
After you’re done adding all your content to the course, you can now finally Publish your course to be visible to your users.
Front-end course builder
The front-end course builder is one of the unique features of Tutor Pro, which is not available on any other LMS plugin. It allows very new instructors the freedom to use their LMS without having to go to the back-end admin panel every time.
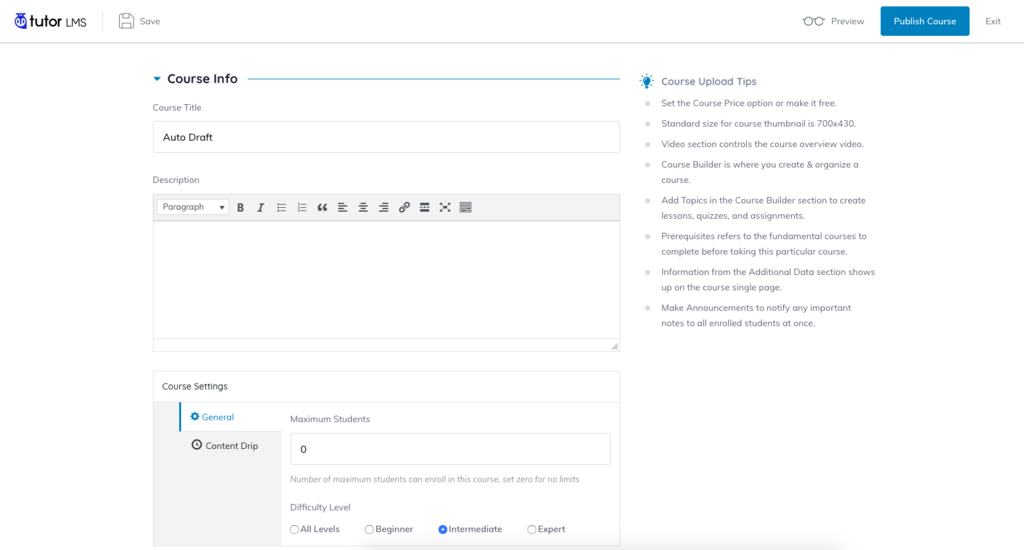
Keep in mind, though, that you still have to approve it for publishing from the back-end admin panel. However, everything in the back end is available here on the front end.
4. Create quizzes
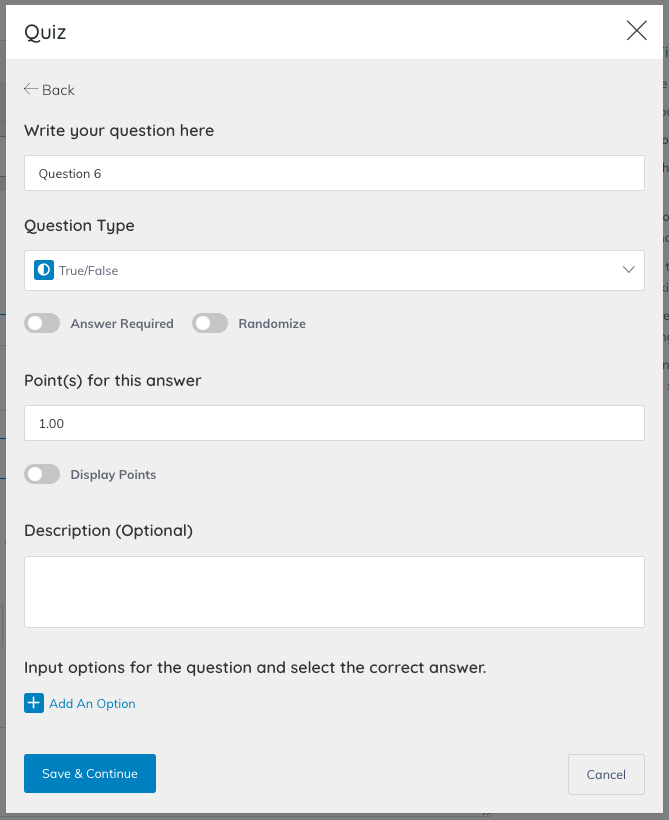
Creating quizzes is the same for both the front-end and back-end course builders. Tutor LMS gives you a total of 10 types of questions to ask the students, each with its own type of advantages and customization options.

After giving your quiz a name and an optional description, you can start adding questions and their answers. You can set the question to randomize the options, as well as make it a mandatory answer by using the Required toggle. You can also change the weight of the question by changing the points for the answer. This is useful for when you have open-ended questions that justifiably should carry more marks than true/false type questions only.
5. Monetize and integrate WooCommerce
To make your course premium, you must first add a WooCommerce Product. To do so, go to your WordPress admin panel, then navigate to WooCommerce → Products → Add New. You can now create a product by giving it a name, description, regular price, and sale price.
You can also add a new schedule for the sale of this product. Additionally, make sure that For Tutor is ticked so that Tutor LMS can use it for product sales. After adding this product, you can publish it.
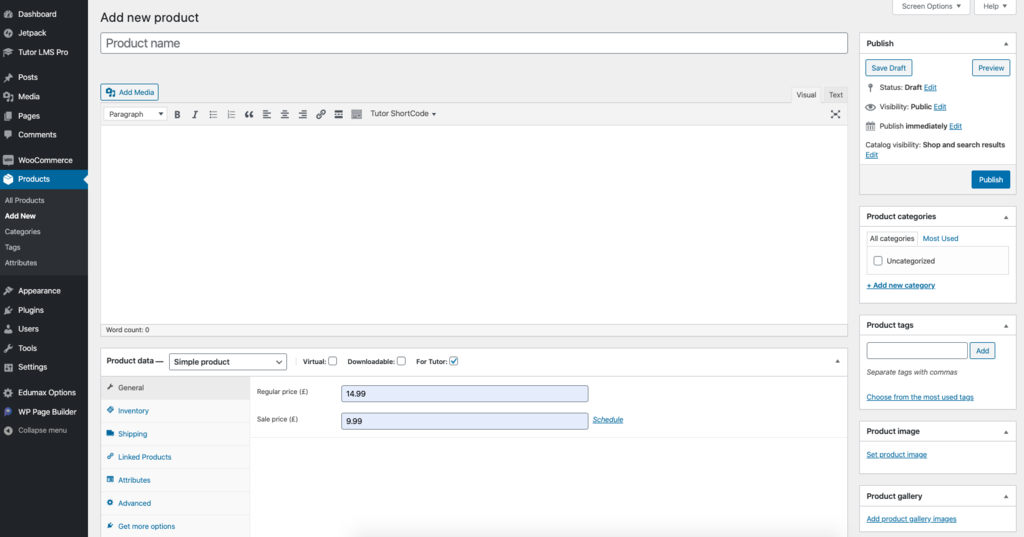
Once that is done, you should head to your course’s back-end and click on the Edit Course button to manage that course. Scroll down to the Add Product, this is where you can attach a product to your product, and thereby sell the course. From the Select a Product dropdown, select the product you just created previously. This will attach the WooCommerce Product to your course. Make sure to select Paid in the Course Type option, and you’re done with the monetization process of your course.

From here on out, when you’re adding new courses, you should repeat this process of creating new products in order to easily track purchases made on your website.

Conclusion
With Tutor LMS at the helm of your eLearning platform and WooCommerce and VooPlayer there to fill in the gaps, you can easily create an eLearning platform.
As eLearning platforms are growing each year, so will your entrepreneurial spirit as you embark on your new journey. So, what are you waiting for? Grab a domain and start teaching!


Comments
October 04 2020
The idea here looks really good. Is anybody implemented the way in which it is mentioned and any experience or feedback please
January 18 2021
Hi Paulius, A very Informative article, I really enjoyed a lot and have learnt so much from this article. Looking more from your side!
April 19 2021
Hello Paulius, I love your website because of all type info available on your site and this post is very useful for me. Pretty good post. I just stumbled upon your blog and wanted to say that I have really enjoyed reading your blog posts.
April 30 2021
Amazing article. Your blog helped me to improve myself in many ways thanks for sharing this kind of wonderful informative blog live. I have bookmarked more articles from this website. Such a nice blog you are providing.
May 06 2021
Hi Sampada! Happy to hear that Hostinger's blog has helped :)
June 04 2021
You have provided best list of eLearning site and explain each thing. Thanks for your support.