How to set up a dedicated 7 Days to Die server
A dedicated 7 Days to Die server lets you customize the game, play multiplayer, and install various mods. However, setting one up can be difficult without the right tools, especially for beginners with minimal system management experience.
This article will explain the 7 Days to Die dedicated server setup process using two methods – automatically using Hostinger’s Game Panel or manually with commands.
Both methods have the same outcome but different use cases. Read through to figure out which one is more convenient for you.

Prerequisites
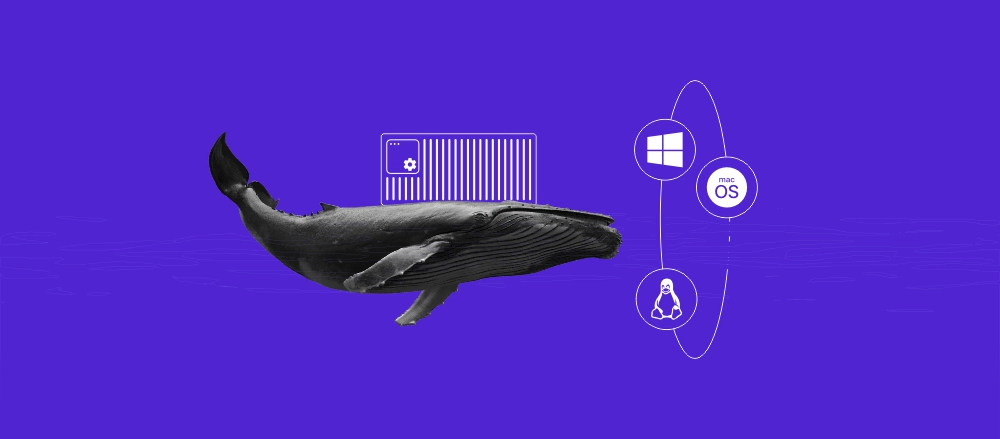
To set up a private 7 Days to Die host, you need a virtual private server (VPS). Ideally, it should run a newer version of the Linux operating system since the configuration steps differ otherwise. For this tutorial, we will use Debian 12.
Your VPS must also have sufficient hardware resources to ensure optimal performance and a smooth gameplay experience. We recommend a system with at least a dual-core CPU and 8 GB of RAM, according to the game’s minimum requirement.
If you wish to use our Game Panel, the Hostinger Game Panel 2 plan of 7 Days to Die hosting is also a great option. It offers additional game-focused features like a one-click mod installer. In addition, it comes with various features that help simplify the game server management tasks, like Kodee, Hostinter’s own AI assistant, and Browser terminal.

Setting up 7 Days to Die dedicated server with Hostinger’s Game Panel
Hostinger Game Panel provides a graphical user interface that lets users easily set up a 7 Days to Die dedicated server. In addition to making the process beginner-friendly and more time-efficient, it helps avoid errors since you won’t run the wrong commands.
Moreover, Hostinger Game Panel hosting supports various other popular games with dedicated servers, like Minecraft and Rust. It updates regularly to maintain compatibility with newer titles and major updates.
After purchasing a Hostinger’s game hosting plan, you should automatically land on the onboarding page. Complete the initial VPS setup tasks, like creating a new password and choosing your desired data center location.
Once finished, follow these steps to set up the 7 Days to Die server using the Hostinger Game Panel:
- Log in to hPanel and select VPS → Manage.
- In the VPS Overview menu, click Manage panel. This will open a new tab.

- Enter the admin credentials from the previous Overview menu and click Login.
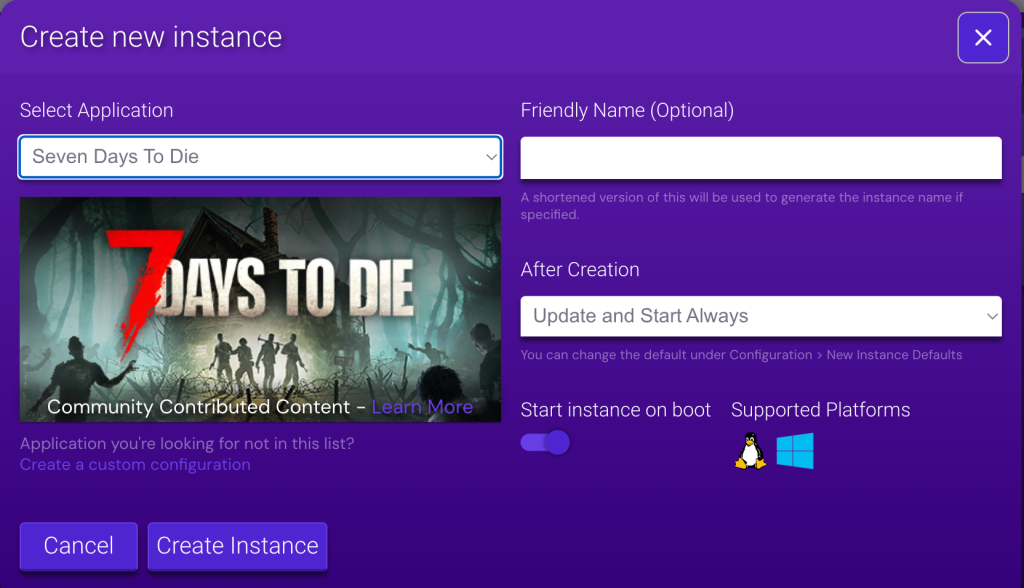
- Click Create Instance and select 7 Days to Die as the application. Hit Create Instance.
- Once the creation process is complete, double-click the instance. Press Start to run your game server.
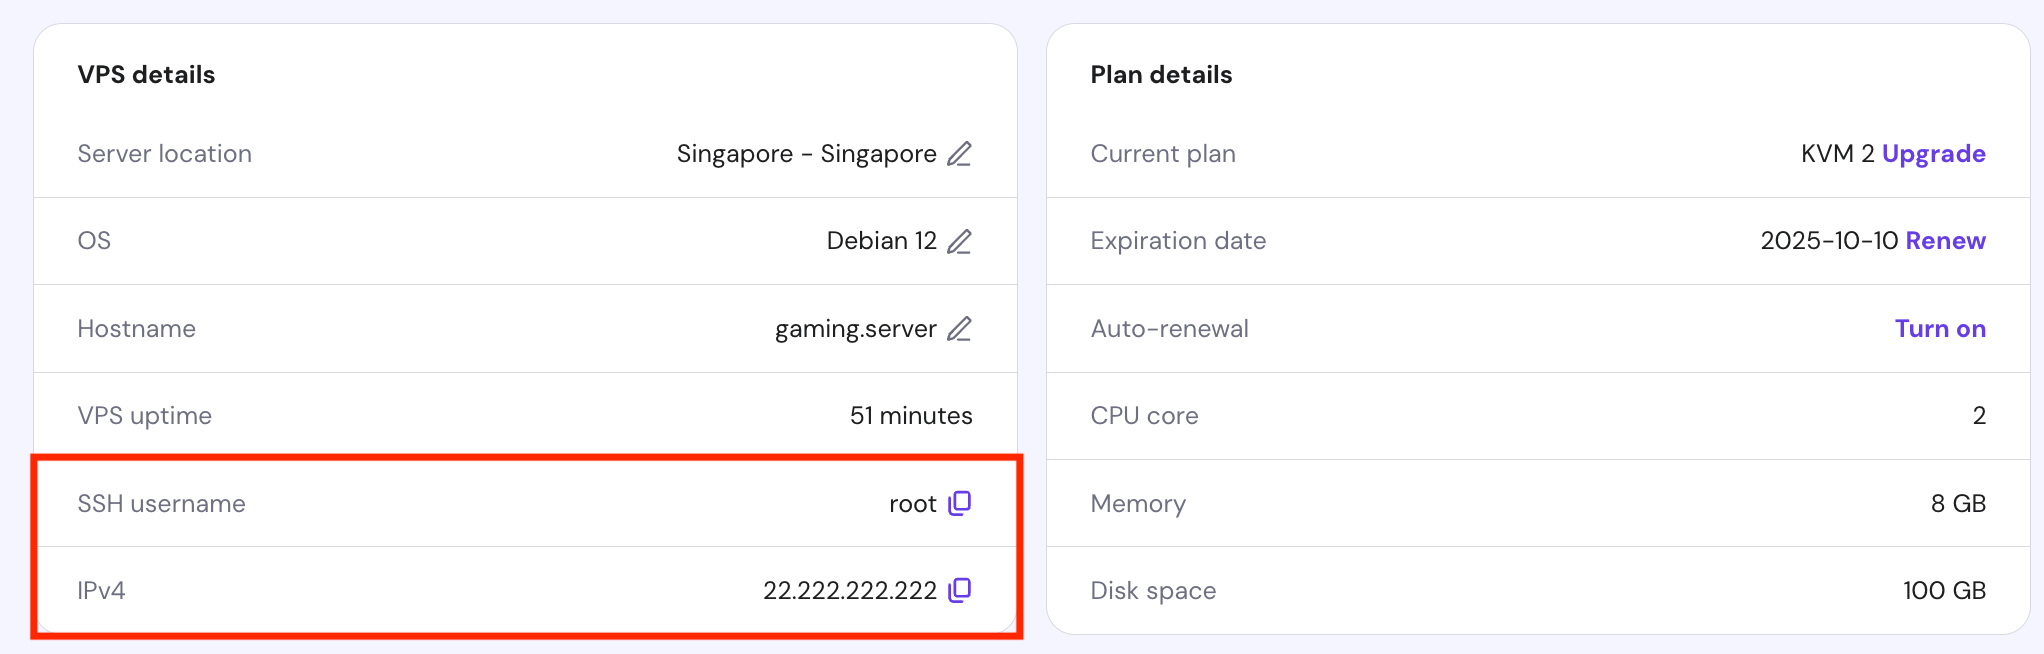
- From the same menu, obtain the Connection info details. You need them to connect to the server from the 7 Days to Die game client.

You can now play online with your friends. To change the server settings, double-click the instance and navigate to the sidebar → Configuration.
Setting up 7 Days to Die dedicated server manually
You can also manually set up the 7 Days to Die dedicated server using commands if you wish to use different software components. In this section, we will explain how to do so on Debian-based systems.
1. Set up your VPS
Before running commands on your VPS, connect to the system using an SSH client like PuTTY, Terminal, or Hostinger’s Browser terminal. You can find the login credentials by navigating to the VPS details section at the bottom of your VPS Overview page.
By default, you will log in as root, which can run any administrative command without confirmation. Using this account to manage your server can be risky since you are more prone to running dangerous utilities by accident.
To make the setup process safer, we will create a new superuser account. This user requires the sudo prefix and password to run administrative commands, minimizing the risk of accidental executions. Here’s how to do so:
- Create a new user by entering this command. We will set up sevendaysadmin for this tutorial, but you can use any name:
adduser sevendaysadmin
- Enter the user’s password and other details, like the contact information.
- Add the new account to the sudo group to grant it the superuser privilege to run administrative commands:
usermod -a -G sudo sevendaysadmin
- Switch to the new user using this command:
su sevendaysadmin
Your command-line interface should now start with the new username. Enter cd to return to the main system directory, and we can start preparing the hosting environment.

2. Install necessary dependencies
Now, let’s start installing the game server’s software components. Before doing so, update your system’s package to ensure you get the latest version:
sudo apt update && sudo apt upgrade
Install the dependencies – software required for the 7 Days to Die server to run. Here is the command:
sudo apt install software-properties-common gcc-multilib
Next, configure the complementary utilities that we will use for running and modifying the game server. For this tutorial, we will install the following:
- Wget – a tool for downloading files from the internet to your server via the command line.
- Nano – a text editor that lets you modify the game server’s configuration file.
- Screen – a terminal multiplexer that enables the game server to run in the background.
- Tar – a utility to unpack the game server component archive.
To set up these tools at once, run the following commands:
sudo apt install -y wget nano screen tar
Confirm that you have configured all the tools properly by querying their version numbers. To do so, run the following commands one by one:
wget --version

nano --version

screen --version

tar --version
If your command-line interface returns a version number, it means the tool is properly configured. Otherwise, you will see the “Command not found” error message and must reinstall them.
3. Download SteamCMD
Once the dependency and complementary tools are configured, we can install SteamCMD. This software is the command-line version of the Steam game client, which lets you download and install the server files on your VPS. Here are the steps:
- Enable the non-free repository to avoid errors using this command:
sudo add-apt-repository non-free
- Run these commands to instruct the dpkg package manager to handle software components according to the VPS’ CPU architecture:
sudo dpkg --add-architecture i386

sudo apt update -y
- Install SteamCMD from your system’s repository using the following command:
sudo apt install steamcmd -y
- Once installed, run the following to enter the SteamCMD shell:
steamcmd
That’s it! Once your command-line shell changes to Steam>, proceed to the next step to install the 7 Days to Die server.

Note that the steps we mentioned install SteamCMD from the system’s repository. Since it updates less frequently than the official download page, you might not get the newest software.
If you wish to install the latest possible release of SteamCMD, download it from the official website using the wget command:
sudo wget http://media.steampowered.com/installer/steamcmd_linux.tar.gz
Then, unpack the installer package using tar:
sudo tar -xvf steamcmd_linux.tar.gz
Enter the SteamCMD shell by running the steamcmd bash script:
./steamcmd.sh
4. Install 7 Days to Die server
Within the SteamCMD shell, run the following to download the 7 Days to Die server components:
force_install_dir ./7daysded

login anonymous

app_update 294420

quit
You can also use the same commands to update the server components. However, doing so can overwrite the dedicated server setting. Before updating, back up your VPS data to preserve the configuration.

Within the commands, you can specify different server builds on the app_update parameter. For example, use the following to run the beta release:
app_update 294420 -beta alpha13.8
Meanwhile, enter the following to deploy the latest experimental release:
app_update 294420 -beta latest_experimental
To check the available server builds, open the desktop Steam client and navigate to the Library tab. Click the Games drop-down menu and check the Tools box. Navigate to 7days → Properties → Beta.
5. Configure the server
Before starting the 7 Days to Die server, open the necessary port using the configuration file and firewall to ensure the system accepts players’ connections.
To start, change the host settings by modifying the server’s XML config file using Nano:
sudo nano 7daysded/serverconfig.xml
You will see various parameters for adjusting the dedicated server settings. Since we are starting the host for the first time, focus on these important configurations:
- ServerName – the name of your game server.
- ServerPort – the port that your server uses to connect with players.
- ServerVisibility – the rule defining whether the host is discoverable via Steam’s games server browser screen.
- ServerPassword – the credential players will use to join your server.
Change the settings according to your preferences. While you can use the default 26900 port, we recommend changing it since cyber criminals might exploit it to access your server.
The 7 Days to Die server can use TCP and UDP ports of 26900 to 26905. Check the Valve developer wiki to learn more about the settings parameters and their values. After you finish modifying the file, save the changes by pressing Ctrl + X, Y, and Enter.
Now, create a firewall rule to ensure your 7 Days to Die server port accepts players’ connections. You can do so on Debian using Uncomplicated Firewall (UFW). Start by installing it:
sudo apt install ufw -y
Then, open the SSH and your game server ports. For this tutorial, we use the default values:
sudo ufw allow 22/tcp

sudo ufw allow 26900/udp

sudo ufw allow 26900/tcp
Then, enable UFW to apply the rules using the following commands. If you have UFW installed already, replace enable with reload:
sudo enable ufw
Alternatively, Hostinger users can create firewall rules without commands via hPanel. Here are the steps:
- Log in to hPanel and click VPS on the sidebar. Click Manage on your VPS.
- Navigate to the sidebar → Security → Firewall.
- Click Add firewall and enter a name. Click Create.

- Click the three-dot icon on your new Firewall configuration and select Edit.
- Add a new rule that accepts connections from anywhere to your 7 Days to Die port. Remember, you need two rules, each for UDP and TCP.
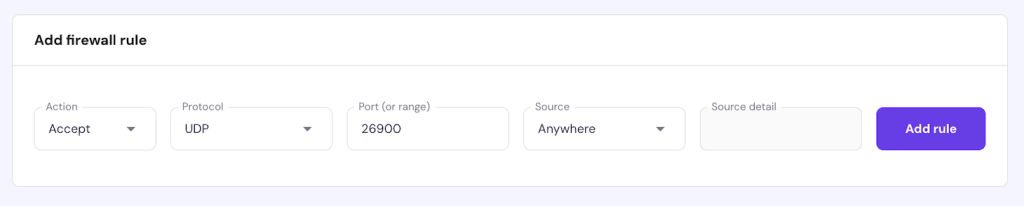
- Once finished, click the arrow icon to return to the Firewall menu and click Activate on your new rule.
6. Start your server
After all the components are ready, let’s start the server. To begin, navigate to the game directory using the following command:
cd 7daysded
Then, run this command to start the server using the default configuration file. If you see entries similar to the screenshot, the host is successfully running and accepting connection:
./startserver.sh -configfile=serverconfig.xml

While you can start the server directly on the main command-line interface, it will shut down when you disconnect from the SSH session. It is inconvenient and unreliable since you must keep Terminal or PuTTY open.
To keep the server running in the background, use a multiplexer tool like Screen. Start by creating a new virtual Terminal session using this command:
screen
Then, navigate to the server folder and run the bash script:
cd 7daysded

./startserver.sh -configfile=serverconfig.xml
To return to the main Terminal session, detach from Screen by pressing Ctrl + A and D. Now, your server is running in the background, and you can disconnect from SSH without affecting the process.
If you want to return to the Terminal session where you run the 7 Days to Die server, enter the following command:
screen -r
7 Days to Die server maintenance and troubleshooting
In this section, we will explain several maintenance best practices to ensure optimal 7 Days to Die server uptime and performance.
Regular maintenance tasks
Routinely optimizing your game server is crucial for maintaining its performance and responsiveness.
For instance, delete unused extensions to free up resource usage for more responsive gameplay. Also, periodically update all your server software to ensure you get the latest security patches and performance improvements.
Hostinger users can easily do these tasks via the Game Panel. They can manage mods using a graphical user interface and schedule automatic updates using the task scheduler.
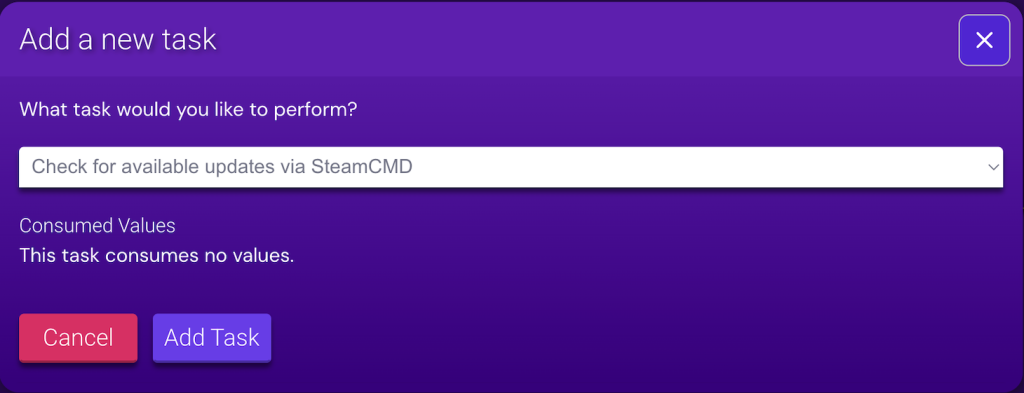
In addition, Game Panel lets you schedule a regular backup, ensuring you have a data reserve to simplify the restoration process in case of cyber attacks or errors.
Common issues and fixes
Connectivity errors often occur when setting up a game server. If it happens, check whether you open the correct port in the configuration file and firewall, especially if you use a non-default value.
If your server couldn’t start, it might be due to corrupted software components or SteamCMD. Try rerunning the installation command to download the missing files:
force_install_dir ./7daysded

login anonymous

app_update 294420

quit
For more accurate troubleshooting, we recommend checking the game server log using the following command:
sudo cat 7daysded/7DaysToDieServer_Data/output_log_[date].txt
You can view events in the Hostinger Game Panel by going to the Deployment Log menu. Moreover, use Kodee to help generate instructions for resolving your game server errors, read your logs, and start or restart your instances.
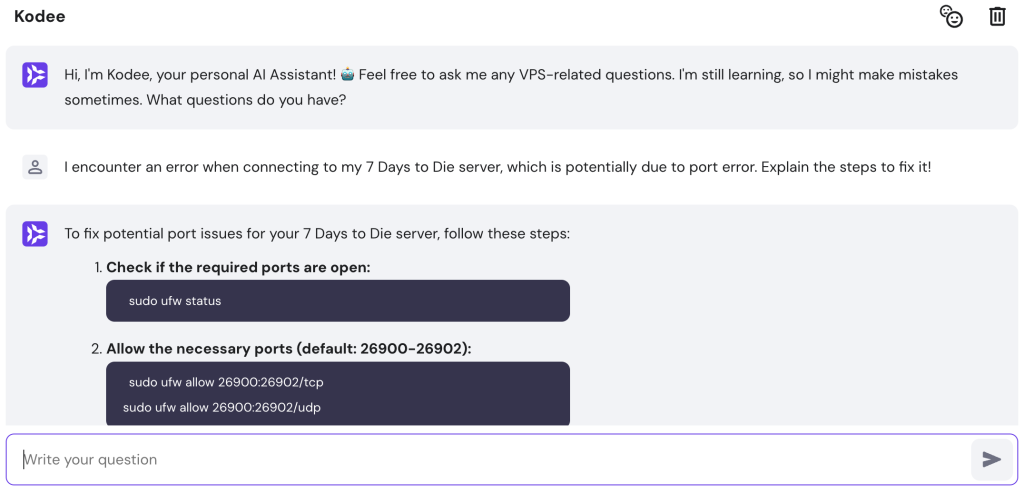
For example, ask, “I encounter an error when connecting to my 7 Days to Die server, which is potentially due to port error. Explain the steps to fix it!”
Conclusion
A private 7 Days to Die server gives you more freedom over the game, and the easiest way to set one up is by using a VPS hosting plan from a provider like Hostinger.
To create a 7 Days to Die server in Hostinger’s Game Panel, simply log in to the control panel and create a new instance. Since this method doesn’t require any commands, it is suitable for beginners with minimal technical knowledge.
Alternatively, you can set up the game server manually using commands. To do so, log in to your Linux VPS via SSH and create a new superuser account. Then, download SteamCMD, its dependencies, and other complementary tools, like Screen.
Enter the SteamCMD shell and download the 7 Days to Die server components. Use nano to modify the host configuration and open the port with UFW. Lastly, create a new Screen session and run the startserver.sh script.
7 Days to Die Dedicated server setup FAQ
This section will answer several common questions about setting up the 7 Days to Die server.
What ports need to be opened for a 7 Days to Die Dedicated server?
By default, the 7 Days to Die dedicated server uses port 26900 TCP/UDP. However, you can use any value between 26900 and 26905. For a local network, it uses port 27015 to 27020 TCP/UDP.
How do I manage player access and permissions on a Dedicated 7 Days to Die server?
To manage players’ in-game behavior and access permissions, run the server console commands. If you want to limit players from accessing your game, you can limit the slots and change the host visibility via serverconfig.xml.
Can I host multiple game worlds on the same 7 Days to Die server?
Yes, you can do so by opening the serverconfig.xml file and copying all the existing world properties under the line. Paste them underneath the original line and change the values accordingly.

Aris is a Content Writer specializing in Linux and WordPress development. He has a passion for networking, front-end web development, and server administration. By combining his IT and writing experience, Aris creates content that helps people easily understand complex technical topics to start their online journey. Follow him on LinkedIn.